
PIX-LINK WR01
Manwal tal-Utent tar-Ripetitur tal-WiFi PIX-LINK 300Mbps
Mudell: WR01
1. Introduzzjoni
The PIX-LINK WR01 300Mbps WiFi Repeater is designed to extend the coverage and improve the signal strength of your existing Wi-Fi network. This device helps eliminate Wi-Fi dead zones, providing a more stable and faster wireless connection throughout your home or office. It supports both Repeater and AP (Access Point) modes, offering versatile connectivity options.

Figura 1: Quddiem view of the PIX-LINK WR01 WiFi Repeater.
2. Prodott Aktarview
The PIX-LINK WR01 features a compact design with integrated antennas and multiple indicator LEDs for easy status monitoring. It also includes a USB port for charging, enhancing its utility as a travel companion.
2.1. Components and Indicators

Figura 2: Dettaljat view of the PIX-LINK WR01 components and indicators.
- LED tal-qawwa: Jindika jekk l-apparat huwiex mixgħul.
- WPS LED: Illuminates during WPS connection attempts.
- LED LAN: Indicates activity on the LAN port.
- LED tar-ripetitur: Shows the status of the repeater function.
- 180° Rotation Antennas: Adjustable antennas for optimal signal reception.
- Detachable Plug: Allows for compact storage and travel.
- Interface WAN: Port for connecting to a modem or router in AP mode.
- Buttuna Irrisettja: Użat biex jirrestawra s-settings default tal-fabbrika.
- USB (5V/2A) Port: Għall-iċċarġjar ta' apparati esterni.
- Buttuna WPS: For quick and secure connection setup with WPS-enabled routers.
- Ventijiet: Għad-dissipazzjoni tas-sħana.
3. Setup
The PIX-LINK WR01 is designed for easy installation. You can set it up using your smartphone, tablet, or laptop, or by utilizing the WPS function.
3.1. Tqegħid Inizjali
For optimal performance, place the repeater in a location that is roughly halfway between your main router and the area where you need improved Wi-Fi coverage. Avoid placing it too close to either the router or the device you are trying to connect, as this can hinder its effectiveness.

Figure 3: Guide to optimal repeater placement for best signal extension.
3.2. Tixgħel
Plug the PIX-LINK WR01 into a standard electrical outlet. The Power LED should illuminate, indicating the device is receiving power.

Figure 4: The PIX-LINK WR01 plugged into a power outlet.
3.3. Metodi ta 'Konnessjoni
3.3.1. WPS (Wi-Fi Protected Setup) Method
- Ensure your main router supports WPS functionality.
- Press the WPS button on your PIX-LINK WR01. The WPS LED will start blinking.
- Within two minutes, press the WPS button on your main router.
- Wait for the WPS LED on the repeater to become solid, indicating a successful connection.
3.3.2. Web Browser Method
- Connect your computer or mobile device to the repeater's Wi-Fi network (usually named "PIX-LINK_XXXX" or similar, without a password).
- Iftaħ a web browser u daħħal l-indirizz IP default (eż. 192.168.10.1) fil-bar tal-indirizz.
- Log in using the default username and password (refer to the included detailed user manual for specifics, often "admin" for both).
- Follow the on-screen wizard to select your desired operating mode (Repeater or AP) and configure network settings.
4. Modi Operattivi
The PIX-LINK WR01 supports two primary operating modes:
4.1. Modalità Ripetitur
In Repeater Mode, the device extends the coverage of an existing Wi-Fi network. It receives the wireless signal from your main router and re-broadcasts it, effectively boosting the signal to areas with poor or no coverage. This mode is ideal for eliminating Wi-Fi dead zones in large homes or offices.
4.2. Modalità AP (Punt ta' Aċċess)
In AP Mode, the device transforms a wired network connection into a wireless one. You connect the repeater to your router or modem via an Ethernet cable (WAN port), and it then creates a new Wi-Fi network. This is useful for adding wireless capability to a wired-only network or creating a separate Wi-Fi network.

Figure 5: Setup diagram for AP Mode, showing wired connection to router.
5. Karatteristiċi addizzjonali
5.1. Port tal-Iċċarġjar tal-USB
The PIX-LINK WR01 includes a 5V/2A USB port, allowing you to charge your mobile devices. This feature makes it a convenient travel accessory, serving as both a Wi-Fi extender and a portable charger.

Figure 6: The PIX-LINK WR01 functioning as a portable charger.
6. Manutenzjoni
To ensure the longevity and optimal performance of your PIX-LINK WR01, consider the following maintenance tips:
- Żomm l-apparat f'żona b'ventilazzjoni tajba biex tevita sħana żejda.
- Evita li tesponi l-apparat għal temperaturi estremi, umdità, jew dawl tax-xemx dirett.
- Naddaf il-barra tal-apparat b'ċarruta ratba u niexfa. Tużax prodotti tat-tindif likwidi jew aerosols.
- Iċċekkja perjodikament għal aġġornamenti tal-firmware fuq il-paġna tal-manifattur website to ensure the device has the latest features and security patches.
7 Issolvi l-problemi
This section addresses common issues you might encounter with your PIX-LINK WR01.
7.1. When to Reset
You may need to reset your device in the following situations:
- When changing between different operating modes (e.g., Repeater to AP).
- If you mistakenly enter the wrong password and fail to connect to the Internet.
- If you are unable to access the login page to change settings.
- When moving the device to a new location where the IP address conflicts with the previous network.
7.2. Kif Irrisettja
Biex twettaq reset tal-fabbrika:
- Ensure the Power LED is solid (device is powered on).
- Locate the Reset hole on the device.
- Using a thin object like a toothpick or paperclip, press and hold the Reset button for approximately 10 seconds until the WPS LED turns off.
- Release the button. The device will restart, and the LAN/WAN LED will illuminate once the reset is complete.
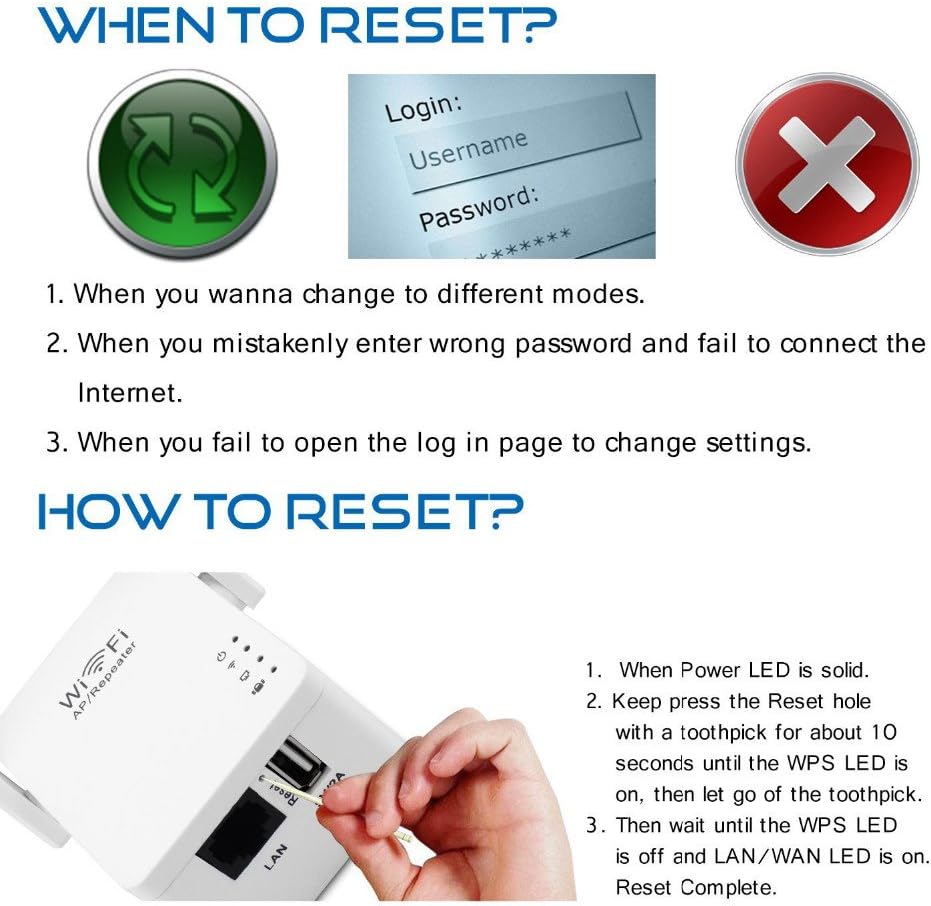
Figure 7: Visual guide for resetting the device.
7.3. Poor Signal or No Connection
- Iċċekkja l-Pjazzament: Ensure the repeater is placed optimally between your router and the desired coverage area, not too close to either. Refer to Section 3.1.
- Ivverifika l-Konnessjoni tar-Router: Confirm that your main router is functioning correctly and broadcasting a strong signal.
- Ikkonfigura mill-ġdid: If issues persist, try reconfiguring the repeater using the web browser method to ensure all settings are correct.
8. Speċifikazzjonijiet
| Karatteristika | Dettall |
|---|---|
| Brand | PIX-LINK |
| Mudell | WR01 |
| Dimensjonijiet | 7 x 5.5 x 4 ċm |
| Piż | 100 g |
| Rata ta' Trasferiment tad-Data | 300 Megabits kull sekonda |
| Komunikazzjoni mingħajr fili Standard | 802.11b, 802.11g, wireless_n |
| Kulur | Abjad |
| Interface | LAN/WAN Port, USB (5V/2A) |
| Input tal-Enerġija | AC Charger (integrated plug) |
9. Garanzija u Appoġġ
All PIX-LINK products come with a 12-il xahar garanzija. If you encounter any issues with your device during this period, please contact PIX-LINK customer support. Our dedicated support team is available to assist you with troubleshooting and technical inquiries, aiming to respond within 24 hours.
Please note that the Wi-Fi Repeater extends Wi-Fi coverage but does not increase the internet speed provided by your original router.
Ask a question about this manual
Ask about setup, troubleshooting, compatibility, parts, safety, or missing instructions. Manuals+ will review the question and use this page’s manual context to help answer it.