
1. Introduzzjoni
The Datavideo HRS-30 is a versatile portable recorder and integrated 10.1-inch monitor designed for professional field recording and playback applications. This device supports both HD and SD video equipment, accepting signals via HD/SD-SDI inputs. It is compatible with various video formats including 1080i, 720p, 576i, and 480i.
The HRS-30 offers flexible recording formats, including MPEG-II Long-GOP or intra-frame (i-frame) with 4:2:2 color sampling. Recorded files are stored in the MXF/OP1A format, ensuring compatibility with a wide range of Non-Linear Editing (NLE) systems and playout solutions. Storage is facilitated by a removable caddy, compatible with standard 2.5-inch HDD and SSD drives.
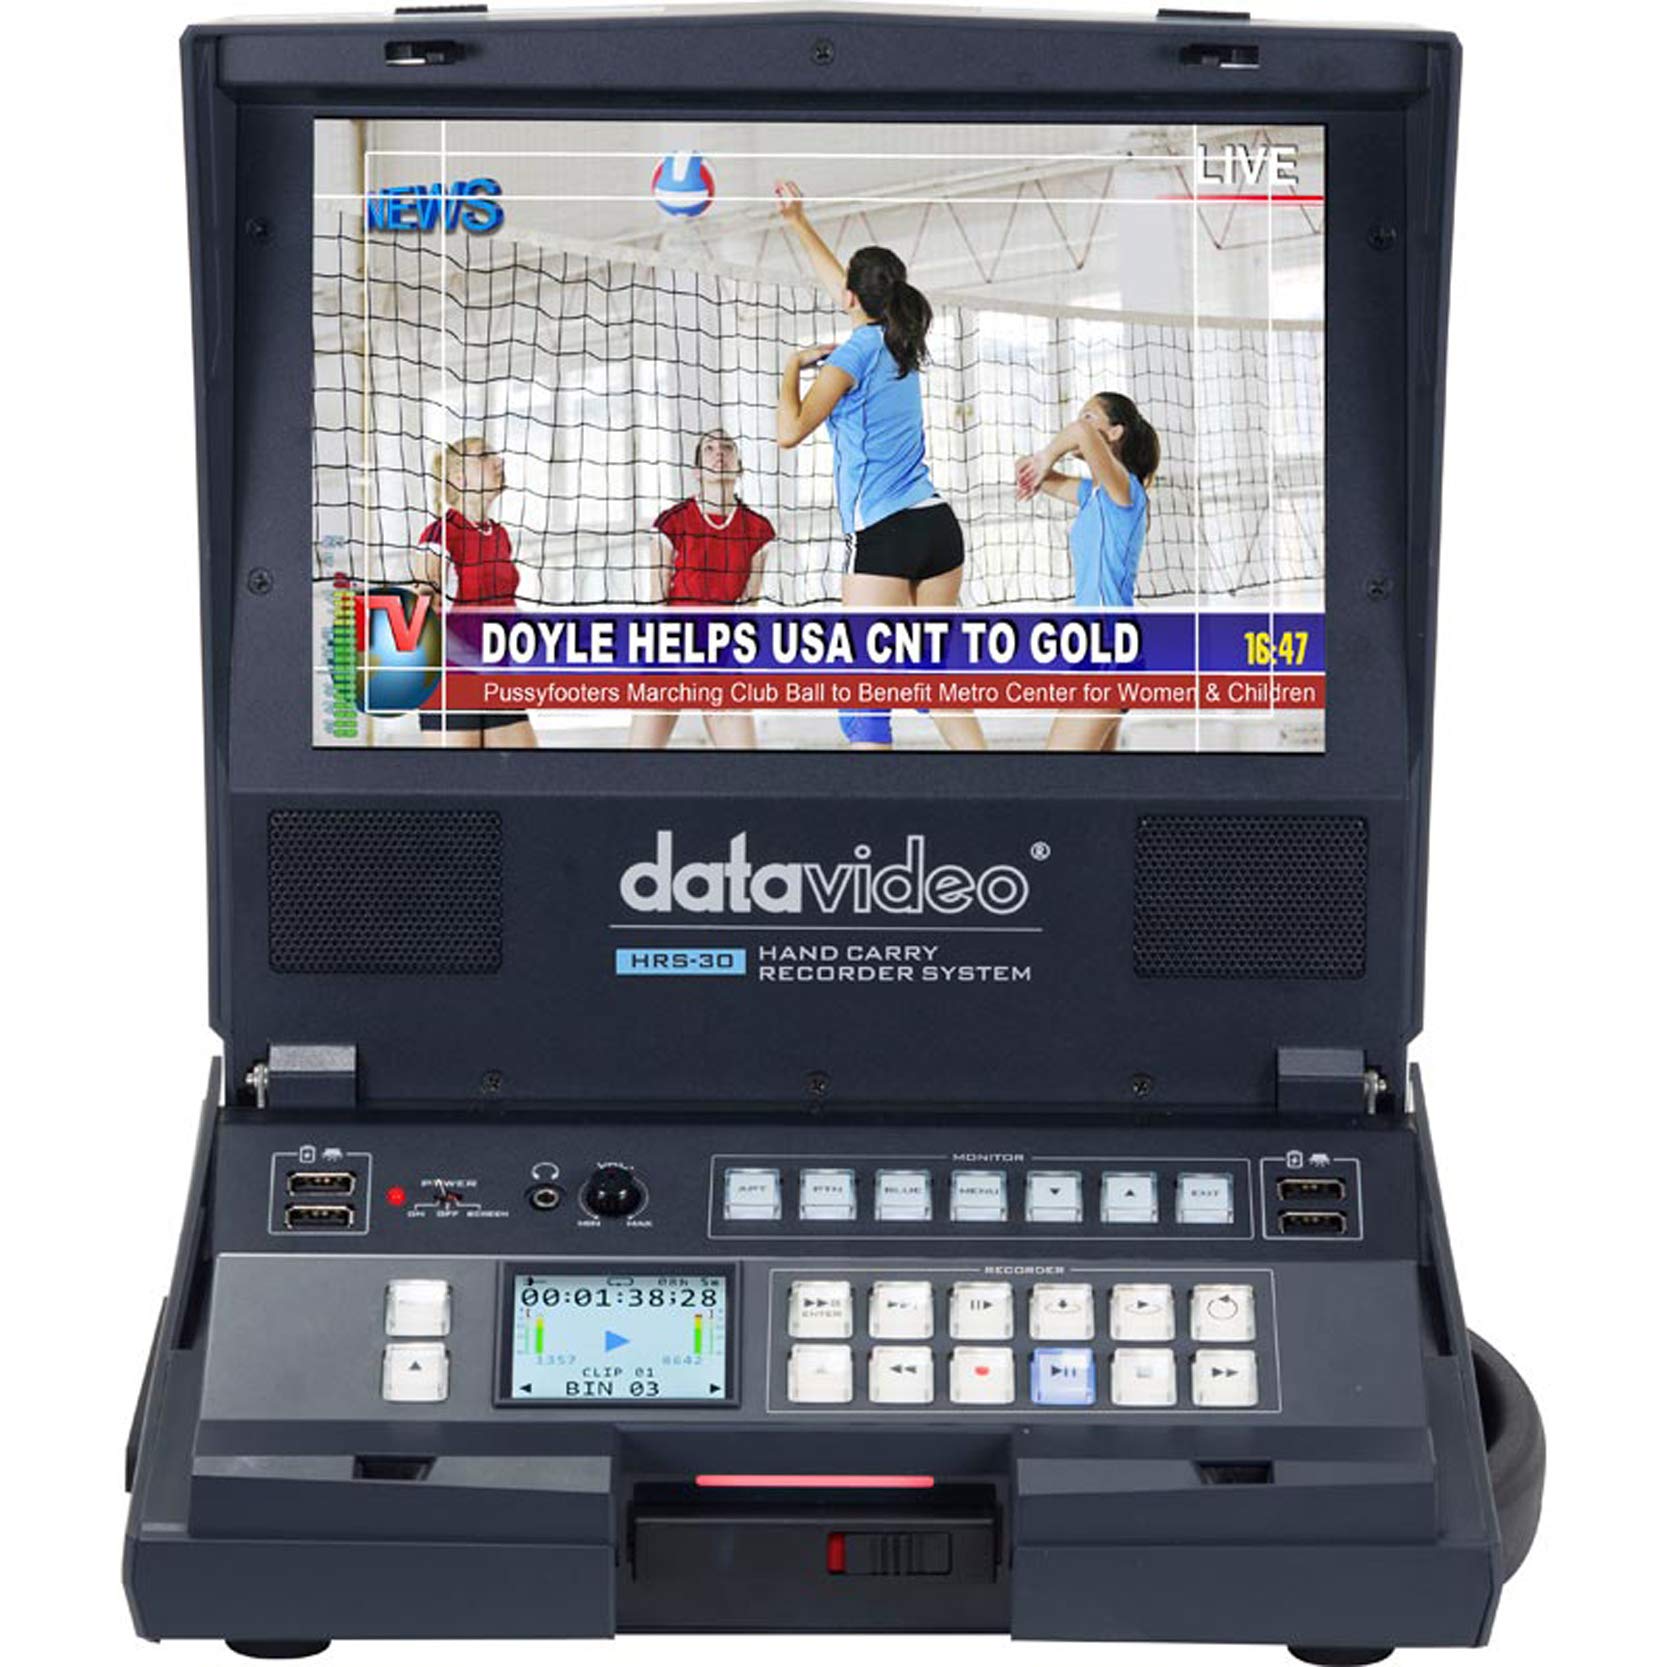
Figura 1.1: Quddiem view of the Datavideo HRS-30 Portable Recorder Monitor, showing the integrated screen and control interface.
2. Informazzjoni dwar is-Sigurtà
Please read and understand all safety instructions before operating the HRS-30. Failure to follow these instructions may result in electric shock, fire, or damage to the unit.
- Sors tal-Enerġija: Uża biss l-adapter tal-enerġija speċifikat u kun żgur li l-volumtage jaqbel mar-rekwiżiti tal-unità.
- Ventilazzjoni: Timblokkax il-fetħiet tal-ventilazzjoni. Kun żgur li jkun hemm fluss tal-arja adegwat madwar l-unità biex tevita li tisħon iżżejjed.
- Ilma u Umdità: Tesponix l-unità għax-xita, għall-umdità, jew tgħaddasha fl-ilma.
- Servizzi: Tippruvax isservi dan il-prodott int stess. Irreferi l-manutenzjoni kollha lil persunal tas-servizz kwalifikat.
- Pjazzament: Place the unit on a stable, level surface. Avoid placing it in direct sunlight or near heat sources.
3. Kontenut tal-Pakkett
Verify that all items are present in the package. If any items are missing or damaged, contact your dealer immediately.
- Datavideo HRS-30 Portable Recorder Monitor Unit
- Adapter tal-Enerġija
- Removable Caddy for 2.5" HDD/SSD
- Manwal għall-Utent (dan id-dokument)
- Additional accessories as specified by your retailer
4. Setup
Follow these steps to set up your HRS-30 unit for operation.
4.1 Installing Storage Media
- Ensure the HRS-30 is powered off.
- Locate the removable caddy slot on the unit.
- Insert a compatible 2.5-inch HDD or SSD into the removable caddy.
- Slide the caddy with the installed drive into the HRS-30's caddy slot until it clicks securely into place.
4.2 Qawwa tal-Konnessjoni
- Connect the power adapter to the DC IN 12V port on the rear of the HRS-30.
- Ipplaggja l-adapter tal-enerġija fi żbokk tal-elettriku adattat.
- Press the POWER switch on the rear panel to turn on the unit.
4.3 Konnessjonijiet tal-Vidjo u Awdjo
The HRS-30 supports various input and output connections. Refer to the rear panel diagram for port locations.
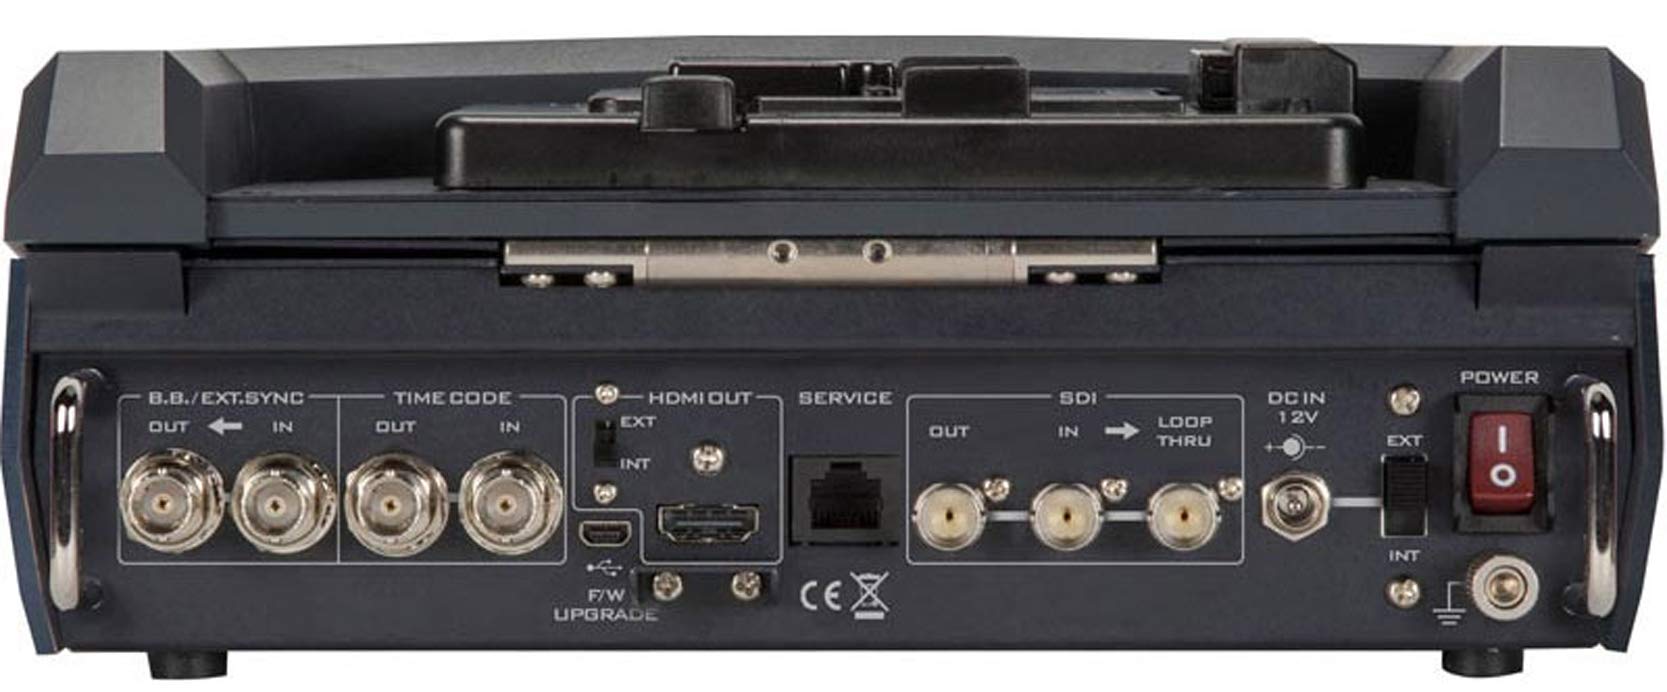
Figure 4.1: Rear panel connections of the Datavideo HRS-30, including SDI, HDMI, Timecode, and Power inputs/outputs.
- Input SDI: Connect your HD/SD-SDI video source to the SDI IN port. The unit also features an SDI LOOP THRU for connecting to another device.
- Ħruġ HDMI: Connect an external monitor or display to the HDMI OUT port for video monitoring.
- Kodiċi tal-ħin: Use the TIME CODE IN/OUT ports for external timecode synchronization.
- BB/EXT.SYNC: Connect Black Burst or external sync signals to the BB/EXT.SYNC IN/OUT ports.
- Port tas-Servizz: Għal aġġornamenti u manutenzjoni tal-firmware.
5. Istruzzjonijiet Operattivi
This section details the basic operation of the HRS-30 for recording and playback.
5.1 Powering On and Initial Screen
- Ensure all necessary connections are made and the storage caddy is installed.
- Flip the POWER switch on the rear panel to the 'ON' position.
- The integrated 10.1-inch monitor will display the boot-up sequence, followed by the live video input or the last recorded clip.
5.2 Reġistrazzjoni tal-Vidjo
The HRS-30 records video from HD/SD-SDI sources in various formats.
- Agħżel Input: Use the control panel buttons to select the desired SDI input source.
- Input tal-monitor: Verify the incoming video signal on the integrated monitor.
- Ibda Reġistrazzjoni: Agħfas il- REC button on the control panel to begin recording. The recording indicator will illuminate.
- Waqqaf ir-Reġistrazzjoni: Agħfas il- STOP button to end the recording. The recording indicator will turn off.
The HRS-30 supports recording in MPEG-II Long-GOP or intra-frame (i-frame) with 4:2:2 color sampling, producing MXF/OP1A files.
5.3 Daqq
Biex terġa 'view recorded content:
- Access Playback Mode: Use the navigation buttons to enter playback mode.
- Agħżel Klipp: Browse through your recorded clips using the navigation controls.
- Ibda l-Daqq: Agħfas il- PLAY button to start playback of the selected clip.
- Kontroll tad-daqq: Uża l- PAWŻA, FFW (Avvanza 'l Quddiem), u REW (Rewind) buttons to control playback.
5.4 Navigazzjoni tal-Menu
The HRS-30 features an on-screen menu system for configuring settings such as video format, recording quality, audio settings, and system preferences. Use the MENU button and directional arrows to navigate, and the ENTER button to confirm selections.
6. Manutenzjoni
Proper maintenance ensures the longevity and optimal performance of your HRS-30.
- Tindif: Use a soft, dry cloth to clean the exterior of the unit. For the screen, use a specialized screen cleaning solution and a microfiber cloth. Do not use abrasive cleaners or solvents.
- Ħażna: When not in use, store the HRS-30 in a cool, dry place, away from direct sunlight and extreme temperatures.
- Aġġornamenti tal-Firmware: Iċċekkja d-Datavideo perjodikament website for firmware updates to ensure your unit has the latest features and bug fixes. Follow the instructions provided with the firmware update carefully.
7 Issolvi l-problemi
This section addresses common issues you might encounter with the HRS-30.
| Problema | Kawża Possibbli | Soluzzjoni |
|---|---|---|
| L-unità ma tixgħelx | No power, faulty adapter, power switch off | Check power cable connection, verify power outlet, ensure power switch is ON. |
| No video on screen | Incorrect input selected, no signal from source, faulty cable | Select correct input, check video source, replace SDI/HDMI cable. |
| Ma tistax tirrekordja | No storage media, full storage, media error | Ensure caddy with drive is installed, check available storage space, format or replace drive if necessary. |
| Playback issues | Korrotti file, incompatible format | Try playing another clip. Ensure recorded files mhumiex korrotti. |
8. Speċifikazzjonijiet
Detailed technical specifications for the Datavideo HRS-30.
- Mudell: HRS-30
- Djagonali tal-Iskrin Viżibbli: 10 pulzieri / 26 ċm
- Dimensjonijiet tal-Prodott: 10.83 x 10.24 x 3.94 pulzieri (27.5 x 26 x 10 ċm)
- Piż tal-oġġett: 7.92 liri (3.6 kg)
- Inputs tal-Vidjo: HD/SD-SDI
- Outputs tal-Vidjo: HDMI, SDI Loop Thru
- Formati tal-Vidjo Sostenuti: 1080i, 720p, 576i, 480i
- Formati tar-reġistrazzjoni: MPEG-II Long-GOP, Intra-frame (i-frame) with 4:2:2 color samplipp
- File Format: MXF/OP1A
- Midja tal-Ħżin: Removable caddy for 2.5" HDD & SSD drives
- Manifattur: Datavideo
- Data L-Ewwel Disponibbli: 23 ta’ Marzu, 2016
9. Garanzija u Appoġġ
For warranty information and technical support, please refer to the official Datavideo website or contact your authorized Datavideo dealer. Keep your purchase receipt as proof of purchase for warranty claims.