
1. Introduzzjoni
This manual provides comprehensive instructions for the installation, operation, and maintenance of your Supermicro X11SSZ-F-O Micro ATX Motherboard. Please read this manual thoroughly before beginning installation to ensure proper setup and to maximize the performance and longevity of your system.
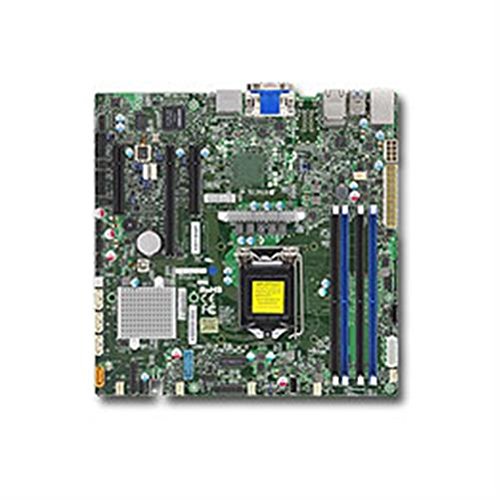
Figure 1: Supermicro X11SSZ-F-O Micro ATX Motherboard. This image displays the motherboard with its various components, including the CPU socket, DIMM slots, and expansion slots.
2. Informazzjoni dwar is-Sigurtà
Dejjem osserva l-prekawzjonijiet ta' sigurtà li ġejjin biex tevita ħsara lill-motherboard u korriment lilek innifsek:
- Skonnettja l-korda tal-enerġija mis-sokit tal-ħajt qabel ma tinstalla jew tneħħi xi komponenti.
- Wear an anti-static wrist strap and work on an anti-static mat to prevent electrostatic discharge (ESD) damage to sensitive components.
- Handle the motherboard by its edges to avoid touching components or circuits.
- Ensure proper ventilation in your system chassis to prevent overheating.
- Żomm il-motherboard 'il bogħod mill-umdità u minn temperaturi estremi.
3. Kontenut tal-Pakkett
Verify that all items are present in your motherboard package. Typical contents include:
- Supermicro X11SSZ-F-O Motherboard
- Tarka I / O
- Kejbils SATA
- Driver CD/DVD or USB drive
- Quick Installation Guide or User Manual
Jekk xi oġġetti huma nieqsa jew bil-ħsara, ikkuntattja lill-bejjiegħ tiegħek immedjatament.
4. Setup u Installazzjoni
4.1. Lista ta' Kontroll ta' Qabel l-Installazzjoni
- Ensure your power supply is compatible with the motherboard's power connectors (24-pin ATX and 8-pin EPS).
- Prepare your CPU, CPU cooler, DDR4 memory modules, and storage devices.
- Have a Phillips head screwdriver ready.
4.2. Installazzjoni tas-CPU (LGA 1151)
- Sib is-sokit LGA 1151 fuq il-motherboard.
- Imbotta bil-mod il-lieva tat-tagħbija 'l isfel u iġbdu 'l bogħod mis-sokit biex tiftaħ il-qafas taż-żamma tas-CPU.
- Allinja s-CPU mas-sokit bir-reqqa, filwaqt li tiżgura li t-trijangolu tad-deheb fuq is-CPU jaqbel mat-trijangolu fuq is-sokit. Tisforzax is-CPU fis-sokit.
- Lower the retention frame over the CPU and push the load lever back into place until it clicks.
- Installa l-cooler tas-CPU skont l-istruzzjonijiet tal-manifattur tiegħu.
4.3. Installazzjoni tal-Memorja (DDR4)
- Sib l-erba' slots tad-DDR4 DIMM.
- Iftaħ il-klipps fiż-żewġt itruf tas-slott tad-DIMM.
- Allinja l-modulu tal-memorja mas-slott, filwaqt li tiżgura li l-islott fuq il-modulu taqbel maċ-ċavetta fis-slott.
- Agħfas sew 'l isfel fuq iż-żewġt itruf tal-modulu tal-memorja sakemm il-klipps jidħlu f'posthom.
4.4. Installazzjoni tal-Karta tal-Espansjoni
- Identify the desired PCI Express slot (1x PCI-E 3.0 x16, 2x PCI-E 3.0 x8).
- Remove the corresponding metal slot cover from your chassis.
- Allinja l-kard tal-espansjoni mas-slott u agħfas 'l isfel sew sakemm tkun f'postha sew.
- Waħħal il-karta b'kamin jew klipp ta' żamma.
4.5. Installazzjoni ta' Apparat tal-Ħażna (SATA)
- Connect one end of a SATA data cable to one of the four SATA3 ports on the motherboard.
- Qabbad it-tarf l-ieħor tal-kejbil tad-dejta SATA mat-tagħmir tal-ħażna tiegħek (HDD/SSD).
- Qabbad kejbil tal-enerġija SATA mill-provvista tal-enerġija tiegħek mat-tagħmir tal-ħażna.
4.6. Konnessjoni Periferali
- Konnetturi tal-Enerġija: Connect the 24-pin ATX and 8-pin EPS power cables from your power supply to the motherboard.
- Konnetturi tal-Panew ta' Quddiem: Connect the power switch, reset switch, HDD LED, and power LED cables from your chassis to the corresponding pins on the motherboard's front panel header. Refer to the motherboard diagram for pin assignments.
- Intestaturi USB: Connect front panel USB ports to the onboard USB headers.
- Audio Headers: Connect front panel audio jacks to the onboard audio header.
5. Istruzzjonijiet Operattivi
5.1. L-Ewwel Boot u s-Setup tal-BIOS/UEFI
- Wara li tgħaqqad is-sistema tiegħek, qabbad monitor, tastiera, u maws.
- Power on the system. During the Power-On Self-Test (POST), press the designated key (usually DEL or F2) biex tidħol fl-utilità tas-setup tal-BIOS/UEFI.
- Configure essential settings such as date and time, boot order, and enable/disable integrated peripherals as needed.
- Salva l-bidliet u oħroġ mill-BIOS/UEFI. Is-sistema terġa' tibda.
5.2. Installazzjoni tas-Sistema Operattiva u s-Sewwieq
- Daħħal il-midja tal-installazzjoni tas-sistema operattiva tiegħek (USB drive jew DVD).
- Segwi l-istruzzjonijiet fuq l-iskrin biex tinstalla s-sistema operattiva tiegħek.
- Once the operating system is installed, install the necessary drivers from the provided driver CD/DVD/USB or download the latest drivers from the Supermicro website. Key drivers include chipset, audio, and LAN drivers.
6. Manutenzjoni
- Tindif: Naddaf it-trab minn ġewwa l-kaxxa tal-kompjuter tiegħek perjodikament, speċjalment mill-fannijiet u s-sinkijiet tas-sħana, bl-użu ta' arja kkompressata. Kun żgur li s-sistema tkun mitfija u skonnettjata qabel ma tnaddafha.
- Aġġornamenti tal-BIOS/UEFI: Iċċekkja s-Supermicro websit għal aġġornamenti tal-BIOS/UEFI. L-aġġornamenti jistgħu jtejbu l-istabbiltà, il-kompatibilità, u l-prestazzjoni. Segwi l-istruzzjonijiet tal-aġġornament bir-reqqa biex tevita li tagħmel ħsara lill-motherboard.
- Aġġornamenti tas-sewwieq: Żomm id-drajvers tas-sistema tiegħek aġġornati biex tiżgura prestazzjoni ottimali u kompatibilità ma' softwer u ħardwer ġdid.
7 Issolvi l-problemi
Din it-taqsima tindirizza kwistjonijiet komuni li tista' tiltaqa' magħhom:
- Ebda Qawwa: Ensure all power cables (24-pin ATX, 8-pin EPS, CPU fan) are securely connected. Check the power supply unit (PSU) and wall outlet.
- Ebda Display: Verify that the monitor is connected and powered on. Reseat the graphics card (if applicable) and memory modules. Try booting with only one memory module.
- System Beeps: Beep codes often indicate specific hardware issues. Consult the Supermicro website or the motherboard's full manual for a list of beep codes and their meanings. Common issues include memory errors or graphics card problems.
- Is-Sistema Operattiva Mhux Tibbutja: Check the boot order in BIOS/UEFI. Ensure the storage drive with the operating system is detected and set as the primary boot device.
- Instabbiltà/Ħsarat tas-Sistema: This can be caused by overheating, faulty memory, or outdated drivers. Monitor temperatures, run memory diagnostic tools, and update drivers.
8. Speċifikazzjonijiet
| Karatteristika | Speċifikazzjoni |
|---|---|
| Isem tal-Mudell | X11SSZ-F-O |
| Fattur tal-Formola | Mikro ATX |
| Socket tas-CPU | LGA 1151 |
| Chipset | Intel C236 |
| Slots tal-Memorja | 4x 288-pin DDR4 DIMM |
| Tip ta' Memorja | DDR4-2133/1866/1600 ECC/Non-ECC Unbuffered |
| Kapaċità Massima tal-Memorja | 64GB |
| Slots PCI-Express | 1x PCI-E 3.0 x16, 2x PCI-E 3.0 x8 (run at x4) |
| Portijiet SATA | 4x SATA3 (6Gb/s) with RAID 0, 1, 5, 10 support |
| Awdjo | Realtek ALC888S High Definition Audio CODEC |
| LAN | Doppju Gigabit Ethernet |
| Portijiet USB | Total 8 (includes 2x USB 2.0) |
| Proċessuri Kompatibbli | Intel Core i3/i5/i7 (6th/7th Gen), Xeon E3-1200 v5/v6 series |
9. Garanzija u Appoġġ
Supermicro provides a limited warranty for its products. For detailed warranty terms and conditions, please refer to the warranty card included with your product or visit the official Supermicro website. For technical support, driver downloads, and further assistance, please visit the Supermicro support portal:
When contacting support, please have your motherboard model number (X11SSZ-F-O) and serial number ready.