Introduzzjoni
Grazzi tax-xiriasing the STOGA Ubox STV040 Dual Lens Car DVR Camera. This manual provides detailed instructions for the proper installation, operation, and maintenance of your device. Please read this manual thoroughly before using the product to ensure optimal performance and safety.
Kontenut tal-Pakkett
Jekk jogħġbok iċċekkja l-kontenut tal-pakkett malli tiftaħ. Jekk xi oġġetti huma nieqsa jew bil-ħsara, ikkuntattja lill-bejjiegħ tiegħek.
- 1 x STOGA Ubox STV040 Car DVR Camera
- 1 x Ċarġer tal-Karozza
- 1 x Car Mount
- 1 x External GPS Module
- 1 x Manwal għall-Utent
Prodott Overview
Familiarize yourself with the components and features of your STOGA Ubox STV040 Car DVR Camera.

Figura 1: Quddiem view of the DVR camera with the display screen active.

Figura 2: Quddiem view detailing the dual wide-angle lenses and surrounding controls.
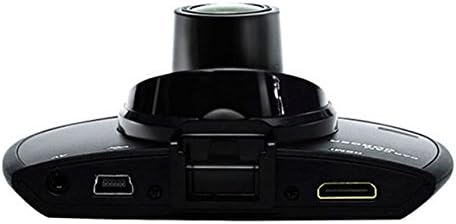
Figura 3: Fuq view illustrating the connectivity ports (HDMI, USB, AV).

Figura 4: Angled perspective of the DVR camera, showing its compact design.
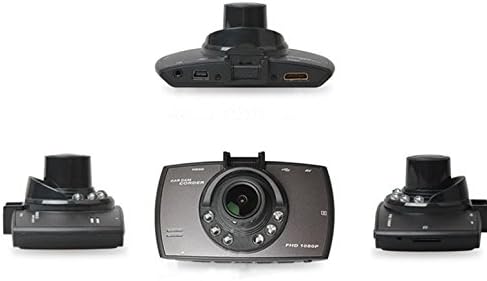
Figura 5: Komprensiv view of the DVR camera from various angles.
Setup
1. Installing the Micro SD Card
Insert a Micro SD card (Class 6 or higher, 4GB-32GB) into the designated slot on the DVR camera. Ensure the card is inserted correctly until it clicks into place. The device supports continuous loop recording and emergency event recording.
2. Immuntar tal-Kamera
- Attach the car mount to the windshield in a position that does not obstruct your view.
- Securely attach the DVR camera to the car mount.
- Adjust the camera angle to ensure both lenses capture the desired view (front and interior/side). The dual lenses are 180-degree rotatable.
3. Konnessjoni tal-Enerġija
Connect the car charger to the DVR camera's power input and plug the other end into your vehicle's 12V power outlet (cigarette lighter socket). The camera will typically power on automatically when the vehicle starts and power off when the vehicle is turned off.
4. GPS Module Connection (Optional)
Connect the external GPS module to the designated GPS port on the DVR camera. This enables GPS logging, recording location data along with video footage.
Istruzzjonijiet Operattivi
Qawwa mixgħul/mitfi
- Awtomatiku: The camera powers on and starts recording automatically when the car engine starts. It powers off automatically when the engine is turned off.
- Manwal: Agħfas u żomm il-buttuna tal-qawwa biex tixgħel jew titfi l-apparat manwalment.
Modi ta 'Reġistrazzjoni
- Reġistrazzjoni Loop: The camera continuously records video in segments. When the memory card is full, it automatically overwrites the oldest unlocked footage.
- Reġistrazzjoni ta' Emerġenza (G-Sensor): The built-in G-Sensor detects sudden impacts or collisions. In such an event, the current video segment is automatically locked and protected from being overwritten.
Navigazzjoni tal-Menu
Use the control buttons located on the device to navigate through the menu options on the 2.0" TFT LCD screen. Adjust settings such as video resolution, date/time stamp, language (English, Chinese, Japanese, Russian), and G-Sensor sensitivity.
Daqq
- Waqqaf ir-reġistrazzjoni jekk tkun attiva bħalissa.
- Enter playback mode via the menu.
- Agħżel il-vidjo mixtieqa file for playback on the device screen.
- Alternatively, remove the Micro SD card and insert it into a computer to view files.
Protezzjoni bil-Password
The device supports password protection to prevent unauthorized access to recordings. Refer to the on-screen menu for setting up and managing this feature.
Manutenzjoni
- Tindif: Use a soft, dry cloth to clean the camera lenses and screen. Avoid abrasive cleaners or solvents.
- Karta Micro SD: Format the Micro SD card regularly (e.g., once a month) to ensure optimal performance and prevent data corruption. Back up important files qabel l-ifformattjar.
- Temperatura: Evita li tesponi l-apparat għal temperaturi estremi, dawl tax-xemx dirett għal perjodi twal, jew umdità għolja.
- Aġġornamenti tal-Firmware: Iċċekkja l-manifattur webŻur is-sit perjodikament għal kwalunkwe aġġornament tal-firmware disponibbli biex tittejjeb il-prestazzjoni u jiżdiedu l-karatteristiċi.
Issolvi l-problemi
| Problema | Kawża / Soluzzjoni Possibbli |
|---|---|
| Il-kamera ma tixgħelx. |
|
| Ir-reġistrazzjoni tieqaf ħesrem. |
|
| Kwalità fqira tal-vidjo. |
|
| Il-GPS mhux qed jaħdem. |
|
| Il-batterija ma żżommx iċ-ċarġ. |
|
Speċifikazzjonijiet
| Karatteristika | Dettall |
|---|---|
| Numru tal-Mudell | Ubox STV040 |
| Wiri | 2.0" TFT LCD (960 x 240 pixels) |
| Lentijiet | Dual 140-degree A+ wide-angle, 180-degree rotatable |
| Sensor | CMOS |
| Riżoluzzjoni tal-vidjo | 1280 x 480 @ 30 fps, 640 x 480 @ 30 fps |
| Format tal-vidjo | AVI |
| Format tal-Immaġni | M-JPG |
| Viżjoni bil-lejl | Funzjoni ta 'viżjoni bil-lejl infra-aħmar |
| Ħażna | Micro TF (SD HC) card, 4GB-32GB, Class 6 and above |
| GPS | Supports external GPS module |
| G-Sensor | Integrated, supports emergency event recording lock |
| Mikrofonu/Kelliem | Integrata |
| Output | CVBS (Video Output) |
| Batterija | 3.7V 700mA Lithium-Polymer battery |
| Kompatibilità tas-Sistema Operattiva | Windows 2000/XP/Vista/Windows 7 |
| Lingwi Appoġġjati | English, Chinese, Japanese, Russian |
Garanzija u Appoġġ
For warranty information and technical support, please refer to the documentation provided with your purchase or contact your retailer. Keep your purchase receipt as proof of purchase for warranty claims.
For further assistance, you may also visit the official STOGA website (if available) or contact their customer service department.