
1. Introduzzjoni
This manual provides detailed instructions for the installation, operation, and maintenance of the Supermicro MBD-X10SLH-F-O uATX Server Motherboard. Please read this manual thoroughly before beginning installation to ensure proper setup and to maximize the performance and longevity of your system. This motherboard is designed for server applications, supporting Intel LGA1150 processors and DDR3 memory.
2. Prodott Aktarview
The Supermicro MBD-X10SLH-F-O is a high-performance uATX server motherboard featuring the Intel C226 chipset. It is engineered for reliability and efficiency in server environments.
Karatteristiċi ewlenin:
- Socket tas-CPU: LGA1150, supporting Intel Xeon E3-1200 v3/v4 series, 4th/5th Gen Core i3, Pentium, Celeron processors.
- Memorja: 4x 204-pin DDR3-1600 SODIMM slots, supporting up to 32GB ECC/non-ECC Unbuffered memory.
- Slots ta' Espansjoni: 1x PCI-Express 3.0 x16, 1x PCI-Express 2.0 x8, 1x PCI-Express 2.0 x4.
- Ħażna: 6x SATA3 (6Gbps) ports.
- Konnettività: Dual Gigabit Ethernet LAN ports (2x RJ45) and 1x Dedicated IPMI LAN port (RJ45).
- Portijiet USB: 4x USB 3.0 ports, 6x USB 2.0 ports.
- Output tal-vidjo: 1x VGA port.
- Fattur tal-Formola: uATX (9.6" x 9.6").
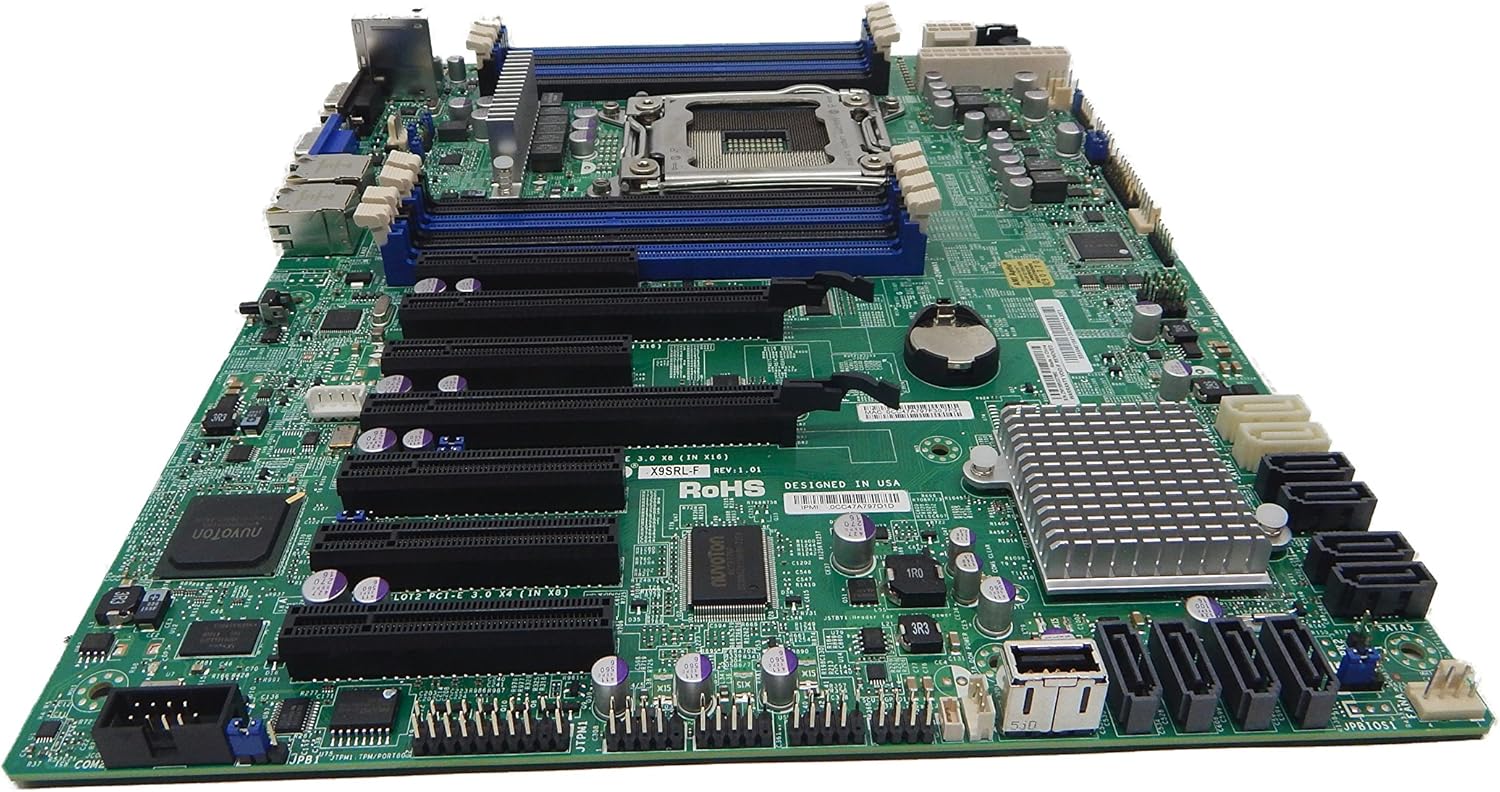
Figura 2.1: Minn fuq għal isfel view of the Supermicro MBD-X10SLH-F-O motherboard, showing the CPU socket, RAM slots, and various expansion slots.

Figura 2.2: Angolat view of the motherboard, highlighting the LGA1150 CPU socket and the four DDR3 SODIMM memory slots.

Figura 2.3: Wara view of the Supermicro MBD-X10SLH-F-O motherboard, displaying the I/O panel with USB, VGA, LAN, and IPMI ports.

Figura 2.4: Close-up view of the motherboard, showing the six SATA3 ports and other onboard connectors.
3. Speċifikazzjonijiet
| Karatteristika | Speċifikazzjoni |
|---|---|
| Brand | Supermicro |
| Isem tal-Mudell | MBD-X10SLH-F-O |
| Socket tas-CPU | LGA 1150 |
| Tip ta' Ċipset | Intel C226 |
| Proċessuri Kompatibbli | Intel Core i3-4xxx, i5-4xxx, i7-4xxx, i3-5xxx, i5-5xxx, i7-5xxx, Intel Xeon E3-1200 v3/v4 series |
| Teknoloġija tal-Memorja RAM | DDR3 |
| Veloċità tal-Memorja | 1600 MHz |
| RAM Massima Appoġġjata | 32 GB |
| Numru ta 'USB 2.0 Ports | 6 |
| Numru ta 'USB 3.0 Ports | 4 |
| Portijiet SATA | 6x SATA3 (6Gbps) |
| Slots ta 'Espansjoni | 1x PCIe 3.0 x16, 1x PCIe 2.0 x8, 1x PCIe 2.0 x4 |
| Fattur tal-Formola | uATX |
| Dimensjonijiet (LxWxH) | 14 x 11 x 3.5 pulzieri |
| Piż tal-oġġett | 3.52 uqija |
4. Setup
Before beginning installation, ensure your system is powered off and disconnected from the power source. Always handle the motherboard by its edges to avoid static discharge.
4.1. Installazzjoni tas-CPU
- Erfa' bil-mod il-lieva tas-sokit tas-CPU.
- Align the CPU with the socket, ensuring the gold triangle on the CPU matches the triangle on the socket.
- Poġġi s-CPU fis-sokit bir-reqqa mingħajr ma tisforzah.
- Lower the socket lever and secure it.
- Applika l-pejst termali u installa l-cooler tas-CPU skont l-istruzzjonijiet tal-manifattur tiegħu.
4.2. Installazzjoni tal-Memorja
- Iftaħ il-klipps fiż-żewġt itruf tas-slott tad-DIMM.
- Allinja l-inċiżjoni tal-modulu tal-memorja maċ-ċavetta fl-islott tad-DIMM.
- Agħfas sew 'l isfel fuq iż-żewġt itruf tal-modulu tal-memorja sakemm il-klipps jidħlu f'posthom.
4.3. Installazzjoni tal-Karta tal-Espansjoni
- Remove the corresponding slot cover from your chassis.
- Align the expansion card with the desired PCIe slot.
- Press down firmly until the card is fully seated.
- Waħħal il-karta b'kamin jew klipp ta' żamma.
4.4. Konnessjoni tal-Apparat tal-Ħażna
- Qabbad tarf wieħed ta' kejbil tad-dejta SATA ma' port SATA fuq il-motherboard.
- Qabbad it-tarf l-ieħor tal-kejbil tad-dejta SATA mat-tagħmir tal-ħażna tiegħek (HDD/SSD).
- Qabbad kejbil tal-enerġija SATA mill-provvista tal-enerġija tiegħek mat-tagħmir tal-ħażna.
4.5. Konnessjonijiet tal-Enerġija
- Qabbad il-konnettur ewlieni tal-enerġija ATX ta' 24-pin mill-provvista tal-enerġija tiegħek mal-motherboard.
- Qabbad il-konnettur tal-enerġija tas-CPU ATX 12V ta' 8 pinnijiet (jew 4 pinnijiet) mal-motherboard.
4.6. Konnessjonijiet tal-Panel ta' Quddiem
Connect the front panel headers (Power LED, HDD LED, Power Switch, Reset Switch, USB, Audio) to the corresponding pins on the motherboard. Refer to the motherboard's silkscreen labels for correct pin orientation.
5. Istruzzjonijiet Operattivi
5.1. L-Ewwel Bidu
- After all components are installed and connected, connect the power cord to your power supply and turn on the power switch.
- Agħfas il-buttuna tal-qawwa fuq ix-chassis tiegħek.
- Is-sistema għandha tixgħel, u għandek tara display fuq il-monitor tiegħek.
5.2. Aċċess għall-BIOS/UEFI
To enter the BIOS/UEFI setup utility, press the designated key (commonly DEL or F2) during the initial boot sequence. The exact key may vary; observe the on-screen prompts.
5.3. Ġestjoni Remota tal-IPMI
This motherboard features a dedicated IPMI LAN port for remote management. To access the IPMI interface, connect the IPMI LAN port to your network. Obtain the IP address assigned to the IPMI interface (either from BIOS or a network scan) and access it via a web browser from another computer on the same network. Java may be required for remote console functionality.
6. Manutenzjoni
Regular maintenance helps ensure the stability and longevity of your motherboard and system.
- Tneħħija tat-Trab: Naddaf it-trab mill-motherboard u l-komponenti perjodikament bl-użu ta' arja kkompressata. Kun żgur li s-sistema tkun mitfija u skonnettjata qabel ma tnaddafha.
- Ġestjoni tal-Kejbil: Kun żgur li l-kejbils kollha huma mgħoddija sew u mwaħħlin sew biex tevita li l-fluss tal-arja jiġi mblukkat u li jkun hemm skonnessjonijiet aċċidentali.
- Aġġornamenti tal-BIOS/Firmware: Iċċekkja s-Supermicro website for the latest BIOS and IPMI firmware updates. Follow the provided instructions carefully. Note that IPMI BIOS upgrades may require a separate license. Always update BIOS before IPMI firmware.
- Verifiki tal-Komponenti: Occasionally inspect all connections (power, data, expansion cards) to ensure they are securely seated.
7 Issolvi l-problemi
Din it-taqsima tindirizza kwistjonijiet komuni li tista’ tiltaqa’ magħhom.
7.1. System Fails to Boot
- Iċċekkja l-Konnessjonijiet tal-Enerġija: Ensure the 24-pin ATX and 8-pin CPU power connectors are securely attached.
- Erġa' poġġi l-Komponenti: Remove and re-install the CPU, memory modules, and any expansion cards to ensure they are properly seated.
- CMOS ċar: Refer to your motherboard's detailed manual for instructions on how to clear the CMOS, which can resolve boot issues caused by incorrect BIOS settings.
- Konfigurazzjoni Minima: Try booting with only essential components (CPU, one RAM stick, power supply, and display) to isolate the problem.
7.2. Fan Speed Issues
Some low RPM, high-efficiency fans may not be accurately detected by the motherboard's fan controller, leading to erratic fan speed behavior (e.g., fans spinning up to max RPM). This is often due to the controller expecting server-grade fans with higher RPM ranges.
- Settings tal-BIOS: Check BIOS settings for fan control options. Adjust fan curves or modes if available.
- 3-Pin vs. 4-Pin Fans: If using 4-pin PWM fans that exhibit this behavior, consider using 3-pin adapters if available with your fans. This can sometimes provide a more stable, albeit less precise, fan control.
- IPMI Fan Control: While IPMI offers fan control, it may have limitations for low RPM fans.
7.3. SATA Port Obstruction
When installing a full-size graphics processing unit (GPU), some SATA ports may become physically blocked or difficult to access.
- Ippjana bil-quddiem: Connect SATA cables to the necessary ports before installing large expansion cards.
- Angled SATA Cables: Use SATA cables with angled connectors if straight connectors are obstructed.
- Alternative Ports: Utilize any unblocked SATA ports first.
8. Informazzjoni dwar il-Garanzija u l-Appoġġ
For detailed warranty information, including terms, conditions, and duration, please refer to the official Supermicro website or the warranty card included with your product. For technical support, driver downloads, and additional documentation, visit the Supermicro support portal.
Uffiċjali tas-Supermicro Websit: www.supermicro.com