
1. Introduzzjoni
This manual provides essential information for the safe and effective installation, operation, and maintenance of your Vimar 14015 Serie Plana 2-Pole White Switch. This product is a 2-pole switch designed for electrical circuits, rated at 16 Amperes and 250 Volts. It features an illuminable and replaceable push button, making it suitable for various residential and commercial applications.
2. Informazzjoni dwar is-Sigurtà
Jekk jogħġbok aqra l-istruzzjonijiet kollha tas-sigurtà bir-reqqa qabel l-installazzjoni u l-użu. Jekk ma ssegwix dawn l-istruzzjonijiet, dan jista' jirriżulta f'xokk elettriku, nar, jew korriment serju.
- Skonnettja l-Enerġija: Always ensure the main power supply to the circuit is turned off at the circuit breaker or fuse box before attempting any installation, wiring, or maintenance.
- Electrician kwalifikat: Installation should only be performed by a qualified electrician or competent person in accordance with all local and national electrical codes and regulations.
- Voltage u kurrenti: Taqbiżx il-vol speċifikattage (250V) and current (16A) ratings of the switch.
- Klassifikazzjoni IP40: This switch has an International Protection Rating of IP40, meaning it is protected against solid objects larger than 1mm but offers no protection against liquids. Do not install in areas where it may be exposed to water or high humidity.
- Materjal: The switch is constructed from metal. Ensure proper grounding if required by local codes.
3. Kontenut tal-Pakkett
- 1 x Vimar 14015 Serie Plana 2-Pole White Switch
4. Installazzjoni
Follow these steps for proper installation of the Vimar 14015 switch.
4.1 Qabel l-Installazzjoni
- Itfi l-Enerġija: Locate the circuit breaker or fuse controlling the area where the switch will be installed and turn off the power. Verify power is off using a voltagtester.
- Ipprepara l-Wajers: Ensure the existing wiring is suitable for a 2-pole, 16A, 250V switch.
4.2 Wajers
The Vimar 14015 switch is designed for 2-way circuits and features quick connect terminals. Refer to the diagram below for terminal identification.
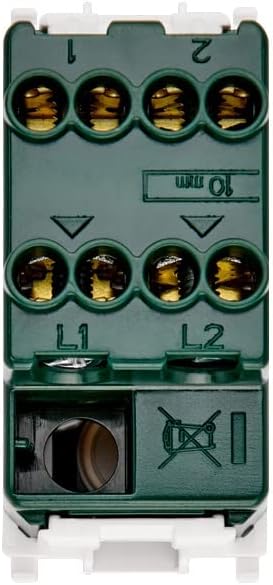
Figura 1: Lura view of the Vimar 14015 switch with wiring terminals. Terminals L1 and L2 are for incoming power lines, and terminals 1 and 2 are for outgoing load connections in a 2-way circuit.
- Connect the incoming live wires to terminals labeled L1 u L2.
- Connect the outgoing load wires to terminals labeled 1 u 2.
- Ensure all connections are secure and wires are fully inserted into the quick connect terminals.
4.3 Immuntar
This switch is designed for surface mount installation.

Figura 2: Ġenb view of the Vimar 14015 switch, indicating its compact design and model identification.
- Carefully place the switch into the appropriate mounting box or frame.
- Secure the switch using the provided screws or clips, ensuring it is flush and stable.
4.4 Wara l-Installazzjoni
- Irrestawra l-Enerġija: Ladarba l-installazzjoni tkun tlestiet u l-konnessjonijiet kollha jkunu siguri, erġa' daħħal l-enerġija fis-circuit breaker.
- Funzjonalità tat-Test: Press the switch button to verify proper ON-OFF operation and check if the illumination functions correctly.
5. Istruzzjonijiet Operattivi
The Vimar 14015 switch operates with a simple push-button mechanism.

Figura 3: Quddiem view of the Vimar 14015 switch, showing the push-button actuator.
- Funzjoni ON/OFF: Press the upper part of the button to turn the connected device or light ON. Press the lower part of the button to turn it OFF.
- Illuminazzjoni: If the switch is configured for illumination, a light indicator will be visible on the button when the switch is in a specific state (e.g., ON or OFF, depending on wiring).
- Replaceable Button: The button is designed to be replaceable. If replacement is needed, ensure power is disconnected before attempting to remove or install a new button.
6. Manutenzjoni
The Vimar 14015 switch requires minimal maintenance.
- Tindif: To clean the switch, wipe it with a soft, dry cloth. Do not use abrasive cleaners, solvents, or excessive moisture, as this can damage the finish or internal components.
- L-ebda Partijiet li jistgħu jservu mill-utent: There are no user-serviceable parts inside the switch other than the replaceable button. Do not attempt to disassemble the switch.
7 Issolvi l-problemi
If you encounter issues with your Vimar 14015 switch, refer to the following common problems and solutions.
- Switch Not Working:
- Ensure the main power supply to the circuit is ON.
- Verify that all wiring connections (L1, L2, 1, 2) are secure and correctly installed.
- Check the connected load (e.g., light bulb) to ensure it is functional.
- Id-Dawl Mhux Taħdem:
- Confirm that the switch is correctly wired for illumination.
- If the illumination is provided by a separate component (e.g., an LED module), ensure it is correctly installed and functional.
If problems persist after attempting these troubleshooting steps, contact a qualified electrician or Vimar customer support.
8. Speċifikazzjonijiet
| Speċifikazzjoni | Valur |
|---|---|
| Brand | Vimar |
| Numru tal-Mudell | SERIE PLANA (14015) |
| Mod ta' Operazzjoni | ON-OFF |
| Klassifikazzjoni kurrenti | 16 Amps |
| Vol Operattivtage | 250 Volts |
| Tip ta' Kuntatt | Normalment Miftuħ |
| Tip ta' Konnettur | Qabbad malajr |
| Tip ta 'Ċirkwit | 2-mod |
| Tip ta' Attwatur | Imbotta Buttuna |
| Klassifikazzjoni tal-Protezzjoni Internazzjonali | IP40 |
| Numru ta' Pożizzjonijiet | 2 |
| Metodu ta' Kontroll | Mess |
| Kulur | Abjad |
| Wattage | 200 watt |
| Materjal | Metall |
| Tip ta 'Immuntar | Immonta fil-wiċċ |
| Dimensjonijiet tal-Prodott (L x W x H) | 0.88 x 1.51 x 1.92 pulzieri |
| Piż tal-oġġett | 1.06 uqija |
9. Garanzija u Appoġġ
Vimar products are manufactured to high-quality standards. For specific warranty information, please refer to the documentation provided with your purchase or visit the official Vimar website. For technical support or assistance, please contact Vimar customer service through their official channels.