
1. Prodott Aktarview
The ASUS M5A97 R2.0 is an ATX AMD motherboard designed to support the latest AMD Socket AM3+ processors, including 8-core CPUs. It features the AMD 970/SB950 chipset, offering robust performance and connectivity options.
Karatteristiċi Ewlenin
- ASUS Exclusive Design: Integrates EPU (Energy Processing Unit) and TPU (TurboV Processing Unit) for optimized energy efficiency and performance scaling.
- Network iControl: Provides real-time bandwidth allocation control for efficient network usage.
- DirectKey: Enables easy BIOS access from standby mode with a dedicated button.
- Windows 8 Ready: Meets hardware requirements for Windows 8 support.
- GO mill-bogħod!: Offers one-stop PC remote control and home entertainment capabilities.
2. Informazzjoni dwar is-Sigurtà
Always observe the following safety precautions when handling and installing your motherboard:
- Skonnettja l-korda tal-enerġija mis-sokit tal-ħajt qabel ma tmiss xi komponenti.
- Wear an anti-static wrist strap or frequently touch a grounded metal object (like the computer case) to discharge static electricity.
- Immaniġġja l-motherboard mit-truf tagħha biex tevita li tmiss komponenti sensittivi.
- Żgura ventilazzjoni xierqa fil-kaxxa tal-kompjuter tiegħek biex tevita li jisħon iżżejjed.
- Keep liquids and moisture away from the motherboard and other electronic components.
3. Kontenut tal-Pakkett
Ivverifika li l-oġġetti kollha huma preżenti fil-pakkett tal-motherboard tiegħek:
- ASUS M5A97 R2.0 Motherboard
- Gwida għall-Utent / Manwal
- Tarka I / O
- Kejbils SATA 6Gb/s (tipikament 2)
- DVD ta' appoġġ (bid-drajvers u l-utilitajiet)
- Q-Connector (optional, for front panel connections)

Image: The ASUS M5A97 R2.0 motherboard, its user guide, and the I/O shield as typically found in the product packaging.
4. Motherboard Component Overview
Familiarize yourself with the key components and connectors on your ASUS M5A97 R2.0 motherboard.
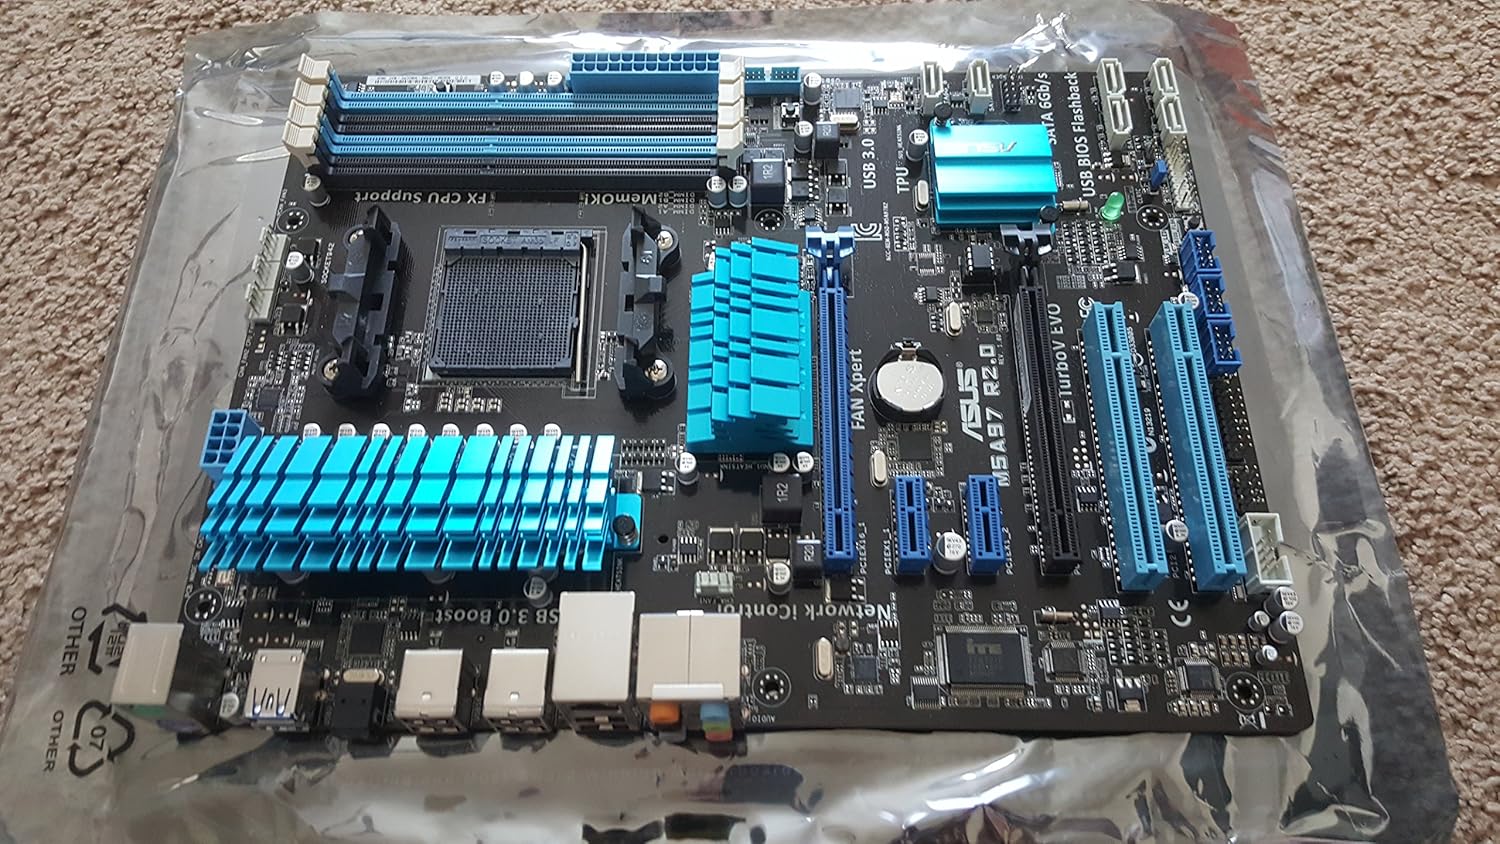
Immaġni: Komprensiva view of the ASUS M5A97 R2.0 motherboard, showing the CPU socket, RAM slots, PCIe slots, and various headers.

Immaġni: Dettaljata view of the AM3+ CPU socket, where the processor is installed.
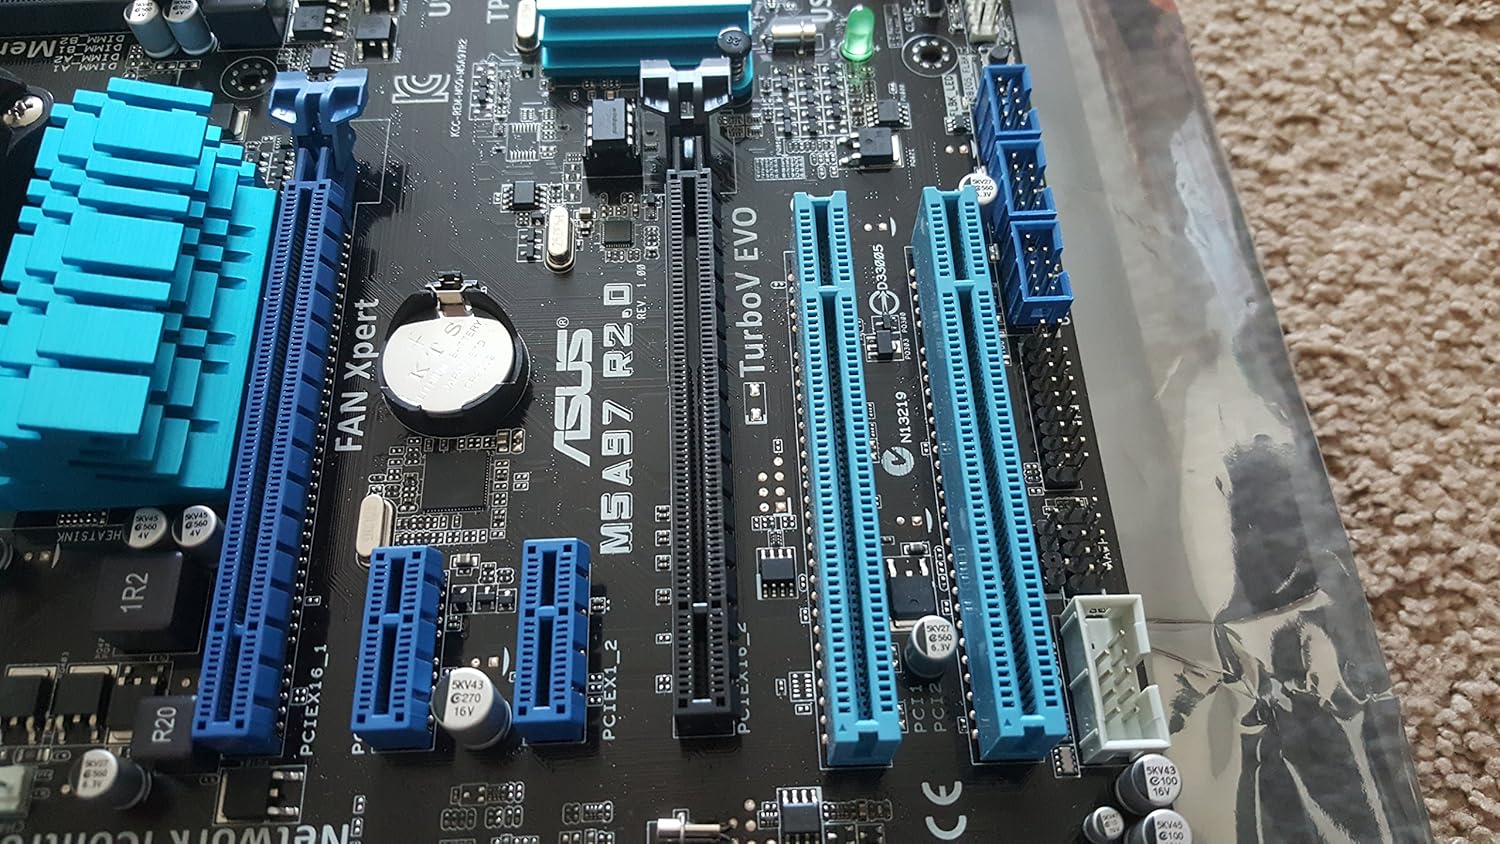
Image: A close-up of the expansion slots, including PCIe x16, PCIe x1, and PCI slots for graphics cards and other expansion cards.

Image: The rear I/O panel, featuring USB 2.0, USB 3.0, LAN, audio, and PS/2 ports.
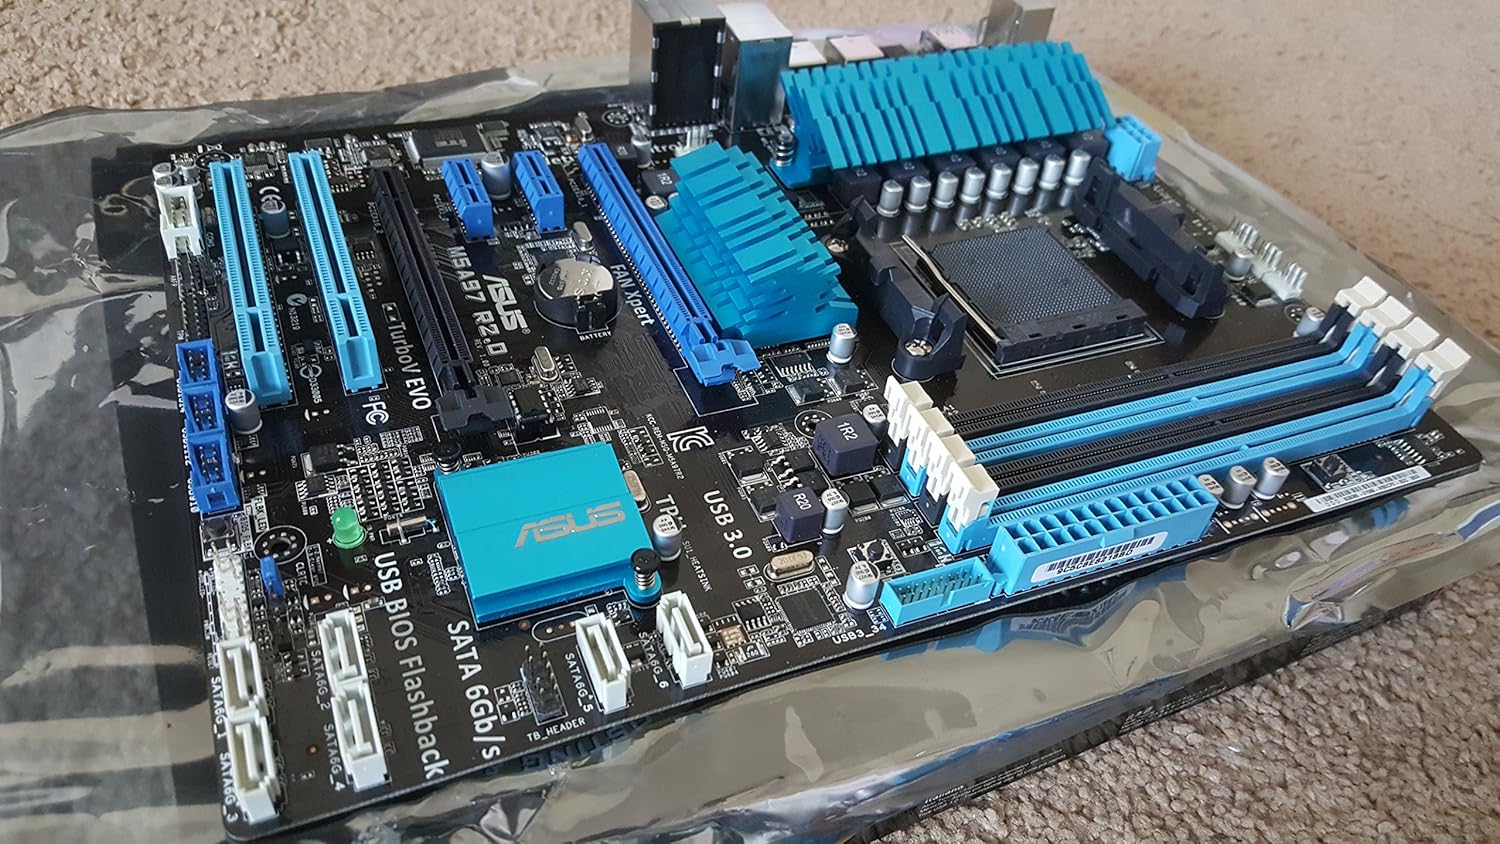
Immaġni: Angolata view highlighting the SATA 6Gb/s ports and various internal headers for front panel connections.

Image: A close-up of the four DDR3 DIMM slots, supporting up to 32GB of RAM.
5. Setup u Installazzjoni
This section provides a general guide for installing your ASUS M5A97 R2.0 motherboard into a compatible computer chassis. Always refer to your chassis manual for specific installation instructions.
5.1. Tħejjija tax-Chassis
- Ensure your computer chassis is powered off and disconnected from the power outlet.
- Remove the side panel(s) of your chassis to access the interior.
- Install the I/O shield provided with your motherboard into the corresponding opening at the rear of the chassis. Ensure it snaps securely into place.
- Identify the motherboard standoffs on the chassis tray. These raised points provide support and prevent short circuits. Most motherboards require 8 or 9 standoffs. Ensure that only the necessary standoffs are present and aligned with the screw holes on your motherboard.
5.2. Installazzjoni tal-Motherboard
- Carefully align the screw holes on your motherboard with the standoffs in the chassis. Also, ensure the rear I/O ports align with the I/O shield.
- Gently lower the motherboard onto the standoffs. It should sit flush against the I/O shield and the standoffs.
- Secure the motherboard using the screws provided with your chassis or motherboard. Start by securing a central screw to hold the board in place, then proceed to screw in the remaining screws in a diagonal pattern to ensure even pressure. Avoid overtightening the screws to prevent damage to the motherboard.
5.3. Konnessi Komponenti
After the motherboard is securely installed, connect the following essential components:
- CPU: Install your AMD AM3+ processor into the CPU socket. Ensure proper alignment and secure the retention lever.
- Cooler tas-CPU: Installa l-cooler tas-CPU skont l-istruzzjonijiet tal-manifattur tiegħu.
- RAM: Insert DDR3 memory modules into the DIMM slots. Ensure the clips on both ends of the slot lock the module in place.
- Provvista tal-Enerġija: Qabbad il-konnettur tal-enerġija ATX ta' 24 pin u l-konnettur tal-enerġija tas-CPU ta' 8 pin (jew 4 pin) mill-provvista tal-enerġija tiegħek mal-motherboard.
- Apparati tal-Ħżin: Connect SATA data cables from your storage drives (HDD/SSD) to the SATA 6Gb/s ports on the motherboard. Connect power cables from the power supply to the drives.
- Karta Grafika: Insert your graphics card into the primary PCIe x16 slot. Secure it with a screw or retention clip on the chassis. Connect any necessary PCIe power cables from the power supply to the graphics card.
- Konnetturi tal-Panew ta' Quddiem: Connect the front panel cables (Power LED, HDD LED, Power Switch, Reset Switch, USB, Audio) from your chassis to the corresponding headers on the motherboard. Refer to your motherboard manual for exact pin layouts.
- Fannijiet tal-Kaxxa: Connect case fans to the available fan headers on the motherboard.
6. Joperaw
Ladarba l-komponenti kollha jkunu installati u konnessi, tista' tipproċedi bl-istartjar inizjali u l-installazzjoni tas-sistema operattiva.
6.1. L-Ewwel Bidu
- Qabbad il-monitor, it-tastiera, u l-maws tiegħek mal-portijiet xierqa fuq il-pannell tal-I/O ta' wara.
- Connect the power cord to your power supply and turn on the power supply switch.
- Agħfas il-buttuna tal-qawwa fuq il-kaxxa tal-kompjuter tiegħek.
- The system should power on, and you should see the ASUS logo or BIOS screen on your monitor.
6.2. Setup tal-BIOS
The BIOS (Basic Input/Output System) is firmware that initializes hardware during the booting process.
- To enter BIOS Setup, press the DEL or F2 key repeatedly during the boot process when the ASUS logo appears.
- In the BIOS, you can configure system settings, boot order, and monitor hardware status.
- For optimal performance, ensure your RAM is running at its rated speed and that the boot order is set correctly for your operating system installation media.
6.3. Installazzjoni tas-sewwieq
After installing your operating system, install the necessary drivers for your motherboard components.
- Use the provided Support DVD to install chipset, audio, LAN, and USB 3.0 drivers.
- Alternatively, download the latest drivers from the official ASUS support website for your specific motherboard model (M5A97 R2.0).
- Install graphics card drivers from the graphics card manufacturer's websit.
6.4. Installazzjoni tas-Sistema Operattiva
Follow the instructions provided with your chosen operating system (e.g., Windows, Linux) to complete the installation process. Ensure all drivers are installed for full functionality.
7. Manutenzjoni
Manutenzjoni regolari tgħin biex tiżgura l-lonġevità u l-prestazzjoni ottimali tal-motherboard u l-PC tiegħek.
- Tneħħija tat-Trab: Periodically clean dust from inside your computer case, especially from fans, heatsinks, and the motherboard surface, using compressed air. Ensure the system is powered off and unplugged.
- Aġġornamenti tal-BIOS: Iċċekkja l-appoġġ tal-ASUS website for BIOS updates. BIOS updates can improve compatibility, stability, and performance. Follow the update instructions carefully to avoid damaging the motherboard.
- Aġġornamenti tas-sewwieq: Żomm id-drajvers tiegħek aġġornati biex tiżgura l-kompatibilità mas-softwer il-ġdid u biex tibbenefika minn titjib fil-prestazzjoni u tiswija ta' żbalji.
- Ġestjoni tal-Kejbil: Kun żgur li l-kejbils huma mqiegħda pulit biex itejbu l-fluss tal-arja u jipprevjenu l-interferenza.
8 Issolvi l-problemi
Jekk tiltaqa' ma' problemi bil-motherboard tiegħek, ikkunsidra l-passi komuni li ġejjin għas-soluzzjoni tal-problemi:
- Ebda Qawwa/Ebda Boot:
- Iċċekkja l-konnessjonijiet kollha tal-enerġija (24-pin ATX, 8-pin CPU, enerġija tal-GPU).
- Ensure the power supply is switched on and functioning.
- Verify front panel power switch connections to the motherboard.
- Try booting with minimal components (CPU, one RAM stick, GPU) to isolate the issue.
- Ebda Display:
- Kun żgur li l-monitor huwa konness u mixgħul.
- Erġa' poġġi l-karta grafika u l-moduli tar-RAM.
- Ittestja b'monitor jew karta grafika differenti jekk possibbli.
- Instabbiltà/Ħsarat tas-Sistema:
- Iċċekkja t-temperaturi tas-CPU u l-GPU.
- Ivverifika li r-RAM hija mwaħħla sew u kompatibbli. Mexxi l-għodod dijanjostiċi tal-memorja.
- Kun żgur li d-drajvers kollha huma installati b'mod korrett u aġġornati.
- Irrisettja s-settings tal-BIOS għad-default.
- Kwistjonijiet Periferali (USB, Awdjo, LAN):
- Ensure relevant drivers are installed.
- Iċċekkja l-konnessjonijiet fiżiċi.
- Verify settings in BIOS.
For more detailed troubleshooting, consult the comprehensive user manual on the ASUS support webis-sit jew ikkuntattja l-appoġġ għall-klijenti tal-ASUS.
9. Speċifikazzjonijiet
| Karatteristika | Speċifikazzjoni |
|---|---|
| Brand | ASUS |
| Mudell | M5A97 R2.0 |
| Socket tas-CPU | Sokit AM3+ |
| Proċessuri Kompatibbli | Sokit AM3+ |
| Tip ta' Ċipset | AMD 970/SB950 |
| Teknoloġija tal-Memorja RAM | DDR3 1800 |
| Daqs Massimu tal-Memorja RAM | 32 GB |
| Veloċità tal-Arloġġ tal-Memorja | 1333 MHz |
| Numru ta 'USB 2.0 Ports | 6 |
| Dimensjonijiet tal-Prodott (LxWxH) | 10.35 x 2.09 x 12.91 pulzieri |
| Piż tal-oġġett | 3.26 liri |
| Batteriji Meħtieġa | 1 batterija CR2 |
10. Garanzija u Appoġġ
For detailed warranty information, technical support, and the latest drivers and utilities, please visit the official ASUS support website. You can typically find support resources by searching for your product model (M5A97 R2.0) on their site.
Żomm il-prova tax-xiri tiegħek għal pretensjonijiet ta' garanzija.