
ASUS P8H77-V
ASUS P8H77-V LGA 1155 Intel H77 ATX Motherboard User Manual
Model: P8H77-V
1. Introduzzjoni
This user manual provides comprehensive instructions for the installation, operation, and maintenance of the ASUS P8H77-V motherboard. Designed for Intel LGA 1155 processors, this ATX motherboard features the Intel H77 chipset, offering robust performance and connectivity for personal computer systems. Please read this manual thoroughly before beginning installation to ensure proper setup and to maximize the performance and longevity of your system.

Figure 1: ASUS P8H77-V Motherboard (Angled View)
This image displays the ASUS P8H77-V motherboard from an angled perspective, showcasing its various components such as the CPU socket, RAM slots, expansion slots, and heatsinks.
2. Prodott Aktarview
The ASUS P8H77-V motherboard is built on the Intel H77 Express chipset, supporting Intel 3rd and 2nd generation Core i7/i5/i3/Pentium/Celeron processors in the LGA 1155 package. It offers a rich set of features for a balanced and efficient computing experience.

Figure 2: ASUS P8H77-V Motherboard (Top-Down View)
Din l-immaġni tipprovdi veduta ċara minn fuq għal isfel view of the ASUS P8H77-V motherboard, highlighting the layout of the CPU socket, four DDR3 DIMM slots, various PCI Express slots, SATA ports, and the chipset heatsink.
Komponenti Ewlenin:
- Sokit tas-CPU (LGA 1155): Supports Intel 3rd/2nd Generation Core i7/i5/i3/Pentium/Celeron Processors.
- Slots tal-Memorja: Four DDR3 DIMM slots supporting up to 32GB of dual-channel DDR3 2200(O.C.)/2133(O.C.)/2000(O.C.)/1866(O.C.)/1600/1333 MHz non-ECC, unbuffered memory.
- Slots ta' Espansjoni:
- 1 x PCIe 3.0 x16 slot (for discrete graphics cards)
- 1 x PCIe 2.0 x16 slot (runs at x4 mode)
- 2 x slots PCIe 2.0 x1
- 3 x PCI slots (for legacy expansion cards)
- Storage Ports:
- 2 x SATA 6Gb/s ports (Intel H77 chipset)
- 4 x SATA 3Gb/s ports (Intel H77 chipset)
- Supports RAID 0, 1, 5, 10
- Portijiet I/O ta' wara: Includes USB 3.0, USB 2.0, HDMI, DVI, VGA, DisplayPort, Gigabit LAN, and 8-channel audio jacks.
3. Setup u Installazzjoni
Proper installation is crucial for system stability and performance. Follow these steps carefully.
3.1 Lista ta' Kontroll ta' Qabel l-Installazzjoni:
- Ensure you have all necessary components: CPU, CPU cooler, RAM, power supply, storage devices, and a compatible PC case.
- Prepare a clean, static-free workspace. Use an anti-static wrist strap or frequently touch a grounded metal object.
- Irreferi għall-manwal tal-kaxxa tal-PC tiegħek għal struzzjonijiet speċifiċi għall-immuntar.
3.2 Component Installation:
- Installazzjoni tas-CPU:
Iftaħ il-lieva tas-sokit tas-CPU bir-reqqa. Allinja l-marka trijangulari fuq is-CPU mal-marka fuq is-sokit. Poġġi s-CPU bil-mod fis-sokit mingħajr ma tisforzah. Agħlaq il-lieva biex twaħħal is-CPU.
- Installazzjoni tal-Cooler tas-CPU:
Apply thermal paste (if not pre-applied on the cooler). Mount the CPU cooler according to its manufacturer's instructions, ensuring it is securely fastened and making good contact with the CPU. Connect the CPU fan cable to the "CPU_FAN" header on the motherboard.
- Installazzjoni tal-Memorja (RAM):
Open the clips on both ends of the DIMM slots. Align the notch on the RAM module with the key in the slot. Press down firmly on both ends of the module until the clips snap into place. For dual-channel operation, install modules in matching colored slots (e.g., A2 and B2).
- Immuntar tal-Motherboard:
Install standoffs in your PC case according to the ATX form factor. Carefully place the motherboard onto the standoffs, aligning the screw holes. Secure the motherboard with screws, ensuring it is firmly seated but not overtightened.
- Konnessjonijiet tal-Provvista tal-Enerġija:
Qabbad il-konnettur ewlieni tal-enerġija ATX ta' 24 pin u l-konnettur tal-enerġija tas-CPU ATX ta' 12V ta' 8 pin (jew 4 pin) mill-provvista tal-enerġija tiegħek mal-portijiet korrispondenti fuq il-motherboard.
- Konnessjonijiet tal-Apparat tal-Ħażna:
Connect SATA data cables from your storage drives (HDD/SSD/ODD) to the SATA ports on the motherboard. Connect SATA power cables from your power supply to the drives.
- Konnessjonijiet tal-Panew ta' Quddiem:
Connect the front panel cables (Power SW, Reset SW, HDD LED, Power LED, USB, Audio) from your PC case to the corresponding headers on the motherboard. Refer to the motherboard's silkscreen labels for correct pin alignment.
- Installazzjoni tal-Karta tal-Espansjoni:
If installing a discrete graphics card or other expansion cards, insert them firmly into the appropriate PCIe or PCI slots until they click into place. Secure them with the case's retention mechanism or screws.
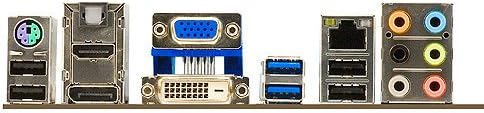
Figure 3: ASUS P8H77-V Motherboard Rear I/O Panel
This image shows a close-up of the rear input/output panel of the ASUS P8H77-V motherboard, detailing the various ports available for connecting external devices such as USB, HDMI, DVI, VGA, LAN, and audio jacks.
4. Istruzzjonijiet Operattivi
4.1 First Boot-Up:
- After all components are installed and connected, connect your monitor, keyboard, and mouse.
- Turn on the power supply and then press the power button on your PC case.
- The system should power on and display the ASUS logo or BIOS POST screen.
4.2 BIOS/UEFI Setup:
- During POST, repeatedly press the DEL ċavetta (jew F2 key) to enter the BIOS/UEFI setup utility.
- In the BIOS, you can configure boot order, system time, fan speeds, and other hardware settings.
- Salva l-bidliet u oħroġ mill-BIOS biex tkompli tibbutja.
4.3 Installazzjoni tas-Sewwieq:
- After installing your operating system, install the necessary drivers for the motherboard's components (chipset, LAN, audio, USB 3.0, etc.).
- Drivers are typically provided on a support DVD included with the motherboard or can be downloaded from the official ASUS support websit.
5. Manutenzjoni
Manutenzjoni regolari tgħin biex tiżgura l-lonġevità u l-prestazzjoni ottimali tal-motherboard u s-sistema tiegħek.
- Tneħħija tat-Trab: Periodically clean dust from inside your PC case, especially from fans (CPU cooler, case fans, GPU fans) and heatsinks. Use compressed air or a soft brush. Ensure the system is powered off and unplugged before cleaning.
- Aġġornamenti tal-BIOS: Iċċekkja l-appoġġ tal-ASUS website for the latest BIOS versions. BIOS updates can improve compatibility, stability, and performance. Follow the update instructions carefully to avoid system damage.
- Aġġornamenti tas-sewwieq: Keep your motherboard drivers updated. Newer drivers can offer performance improvements, bug fixes, and compatibility with new software or hardware.
- Ġestjoni tal-Kejbil: Ensure all cables are neatly routed and not obstructing airflow. Loose cables can interfere with cooling and cause connectivity issues.
6 Issolvi l-problemi
Din it-taqsima tipprovdi soluzzjonijiet għal kwistjonijiet komuni li tista’ tiltaqa’ magħhom.
Kwistjonijiet Komuni u Soluzzjonijiet:
- Bla Enerġija / Is-Sistema Mhux Mixgħul:
- Check if the power supply is switched on and properly connected to the motherboard (24-pin and 8-pin/4-pin CPU power).
- Kun żgur li l-kejbil tal-buttuna tal-enerġija tal-pannell ta' quddiem huwa konness sew mal-header tal-motherboard.
- Ittestja l-provvista tal-enerġija b'sistema oħra jew b'tester tal-provvista tal-enerġija.
- Ebda Display:
- Verify that the monitor is connected to the correct video output (motherboard integrated graphics or discrete graphics card).
- Erġa' poġġi l-karta grafika (jekk applikabbli) u l-moduli tar-RAM.
- Ipprova boot b'RAM stick wieħed biss.
- CMOS ċar (irreferi għall-manwal tal-motherboard għall-post tal-jumper/buttuna).
- Is-Sistema Tiffriża jew Tiġġarraf:
- Iċċekkja t-temperaturi tas-CPU u l-GPU. Tisħin żejjed jista' jikkawża instabbiltà.
- Mexxi għodod dijanjostiċi tal-memorja biex tiċċekkja jekk hemmx RAM difettuża.
- Kun żgur li s-sewwieqa kollha huma aġġornati.
- Check for loose power or data cables to storage devices.
- Peripheral Not Detected (USB, SATA):
- Kun żgur li l-apparat huwa konness sew.
- Iċċekkja l-maniġer tal-apparat fis-sistema operattiva tiegħek għal problemi tas-sewwieq.
- Try a different port or device to isolate the problem.
- Verify that the ports are enabled in BIOS/UEFI.
For more complex issues, consult the ASUS support websit jew ikkuntattja l-appoġġ tekniku.
7. Speċifikazzjonijiet
Detailed technical specifications for the ASUS P8H77-V motherboard.
| Karatteristika | Speċifikazzjoni |
|---|---|
| Brand | ASUS |
| Numru tal-Mudell | P8H77-V |
| Socket tas-CPU | LGA 1155 |
| Chipset | Intel H77 Express |
| Teknoloġija tal-Memorja RAM | DDR3 |
| Veloċità tal-Memorja | 2133 MHz (OC) |
| Daqs Massimu tal-Memorja RAM | 32 GB |
| Portijiet SATA | 2x SATA 6Gb/s, 4x SATA 3Gb/s |
| Portijiet USB 2.0 | 4 (rear) + internal headers |
| Dimensjonijiet tal-Prodott | 12 x 1.7 x 8.9 pulzier (Fattur tal-Forma ATX) |
| Piż tal-oġġett | 2.91 liri |
| L-Ewwel Data Disponibbli | 12 ta’ April, 2012 |
8. Informazzjoni dwar Garanzija
ASUS products typically come with a limited manufacturer's warranty. The specific terms and duration of the warranty may vary by region and product.
- Please refer to the warranty card included with your product packaging for detailed terms and conditions.
- You can also find the most up-to-date warranty information on the official ASUS support websit.
- Żomm il-prova tax-xiri tiegħek (fattura jew riċevuta) għax tkun meħtieġa għal kwalunkwe talba ta' garanzija.
9. Appoġġ
Għal aktar assistenza, appoġġ tekniku, jew downloads ta' sewwieqa, jekk jogħġbok żur is-sit uffiċjali tal-appoġġ tal-ASUS websit:
Appoġġ Uffiċjali tal-ASUS Websit
You can also find FAQs, troubleshooting guides, and contact information for regional support centers on their websit.
Ask a question about this manual
Ask about setup, troubleshooting, compatibility, parts, safety, or missing instructions. Manuals+ will review the question and use this page’s manual context to help answer it.