1. Introduzzjoni
This manual provides comprehensive instructions for the setup, operation, and maintenance of your Geemarc CL100 Amplified Big Button Corded Phone. Please read this manual carefully to ensure proper use and to maximize the benefits of your new telephone.
The Geemarc CL100 is designed for ease of use, featuring large buttons, adjustable amplification, and visual indicators, making it suitable for individuals with hearing or visual impairments. This telephone is line-powered and does not require an external power source.
Nota Importanti: This telephone does not include a built-in answering machine, speakerphone, caller display, talking caller ID, talking keypad, or voice assist functionality.
2. Prodott Aktarview
2.1 Kontenut tal-Pakkett
- Geemarc CL100 Corded Telephone Base
- Handset
- Kurdun ta' l-idejn f'koljaturi
- Kurdun tal-Linja tat-Telefon
- Manwal għall-Utent (dan id-dokument)
2.2 Telephone Layout
Familiarize yourself with the key components and controls of your Geemarc CL100 phone.

Figura 1: Minn fuq għal isfel view of the Geemarc CL100 phone, illustrating the large numeric keypad, function buttons, and memory slots.
- Idejn: For speaking and listening during calls.
- Tastiera numerika: Large, easy-to-read buttons for dialing numbers.
- P1, P2, P3 Buttons: Priority memory buttons for frequently called numbers.
- M1-M9 Buttons: One-touch memory buttons for storing additional numbers.
- Buttuna mill-ġdid: Iċempel l-aħħar numru li ċempel.
- Buttuna Flash: Used for network services (e.g., call waiting).
- Buttuna tal-Aħżen: Used for programming memory numbers.
- Buttuna Mute: Temporarily mutes your microphone during a call.
- Tone Control Switch: Adjusts the audio tone for clearer conversations.
- Swiċċ tal-Kontroll tal-Volum: Adjusts the receiving volume during a call.
- Visual Ringer Indicator: Flashes when an incoming call is received.
- Memory Index Card: Pull-out card for noting stored memory numbers.

Figura 2: Ġenb view of the phone, illustrating the ringer ON/OFF switch and the telephone line connection port.
3. Setup
3.1 Konnessjoni tat-Telefon
- Qabbad il-Handset: Plug one end of the coiled handset cord into the handset and the other end into the handset jack on the side of the telephone base.
- Qabbad il-Linja tat-Telefon: Plug one end of the telephone line cord into the jack labeled with a telephone icon on the back or side of the phone base. Plug the other end into your wall telephone jack.
- Sors tal-Enerġija: The Geemarc CL100 is powered by the telephone line and does not require an external power adapter.
- Ringer Switch: Ensure the ringer switch (located on the side) is set to "Low" or "High" for audible ringing.
3.2 Verifiki Inizjali
- Lift the handset and listen for a dial tone. If no dial tone is present, check all connections.
- Make a test call to ensure proper functionality.
4. Istruzzjonijiet Operattivi
4.1 Tagħmel Sejħa
- Neħħi l-idejn.
- Stenna għat-ton tad-dial.
- Dial the required number using the numeric keypad.
- Upon completion of the call, carefully replace the handset in the cradle to disconnect.
4.2 Tweġiba għal Sejħa
When an incoming call is received, the phone will ring and the visual indicator will flash.
- Neħħi l-idejn biex twieġeb is-sejħa.
- Upon completion of the call, carefully replace the handset in the cradle.
4.3 Last Number Redial
- Neħħi l-idejn.
- Stenna għat-ton tad-dial.
- Agħfas il- Rifilja button. The previously dialed number will be automatically redialed.
- Note: This function does not apply to numbers dialed from memory buttons.
4.4 Funzjoni Mute
The Mute button allows you to speak privately without your caller overhearing.
- Waqt sejħa, agħfas Mute button. You will still hear the caller, but they will not hear you.
- Agħfas il- Mute button again to resume normal conversation.
4.5 Storing Telephone Numbers (Memory Dialing)
Your telephone can store 12 direct memory numbers: 3 priority numbers (P1, P2, P3) and 9 standard memory numbers (M1-M9). Priority memories can store up to 24 digits, and M1-M9 can store up to 32 digits.
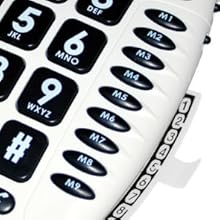
Figura 3: Detail of the memory buttons (M1-M9) and the integrated memory index card.
- Neħħi l-idejn.
- Agħfas il- Aħżen buttuna.
- Dial the telephone number you wish to store.
- Agħfas il- Aħżen buttuna għal darb'oħra.
- Press the desired memory button (P1, P2, P3, or M1-M9) where you want to save the number.
- Ibdel l-idejn.
- Note: Use the index card located under the base to record your stored numbers for easy reference. Stored memories are protected even if the phone line is unplugged.
4.6 Dialing Stored Numbers
- Neħħi l-idejn.
- Stenna għat-ton tad-dial.
- Press the appropriate memory button (P1, P2, P3, or M1-M9). The stored number will be dialed automatically.
4.7 Recall (R), * & # Buttons
These buttons are used in conjunction with new services provided on digital exchanges. For specific details on their use, please contact your network operator.
4.8 Kompatibilità mal-Apparat tas-Smigħ
If you are using this telephone with a hearing aid, set your hearing aid to the "T" (Telecoil) setting for optimal audio quality.
5. Manutenzjoni
- Tindif: Clean the telephone with a soft, damp drapp. Tużax tindif jew solventi li joborxu.
- Ħażna: Aħżen it-telefon f'post frisk u niexef 'il bogħod mix-xemx diretta u minn temperaturi estremi.
- Evita Likwidi: Do not expose the telephone to water or other liquids.
- Kura tal-kurdun: Ensure the handset and line cords are not tangled or pinched to prevent damage.
6 Issolvi l-problemi
| Problema | Kawża Possibbli | Soluzzjoni |
|---|---|---|
| L-ebda ton tal-arloġġ | Il-korda tat-telefon mhix imqabbda sew. | Check that both ends of the telephone line cord are securely plugged in. |
| Ma nistax nisma' lil min qed iċempel / Min qed iċempel ma jistax jismagħni | Volume settings are too low or Mute is active. | Adjust the Volume control. Ensure the Mute button is not pressed. |
| It-telefon ma jdoqqx | Ringer switch is set to "Off". | Set the ringer switch (on the side) to "Low" or "High". |
| Stored memory numbers are lost | This phone protects stored memories even if the phone line is unplugged. If numbers are lost, they may not have been stored correctly. | Re-store the numbers following the instructions in Section 4.5. |
| Difficulty dialing quickly | Some older phone systems may require a slower dialing pace. | Try dialing at a slightly slower pace. Consider using the memory dial function for frequently called numbers. |
7. Speċifikazzjonijiet
- Mudell: Geemarc CL100
- Tip: Telefon bil-Korda
- Amplifikazzjoni: Up to 30 dB receiving volume
- Volum tat-Tajjeb: Aġġustabbli sa 85 dB
- Memorja: 3 Priority (P1-P3), 9 One-touch (M1-M9)
- Sors tal-Enerġija: Line-powered (no external adapter required)
- Kompatibbli għall-Għajnuna tas-Smigħ: Yes (T-coil setting)
- Dimensjonijiet: Madwar 7.5 x 8 x 3 pulzieri (19 x 20.3 x 7.6 cm)
- Piż: Madwar 2.25 libbra (1.02 kg)
- Kulur: Abjad
8. Garanzija u Appoġġ
8.1 Informazzjoni dwar Garanzija
For information regarding the warranty period and terms for your Geemarc CL100 telephone, please refer to the warranty card included with your purchase or visit the official Geemarc websit. Żomm il-prova tax-xiri tiegħek għal talbiet ta' garanzija.
8.2 Appoġġ għall-Klijent
If you encounter any issues not covered in the troubleshooting section or require further assistance, please contact Geemarc customer support. Contact details can typically be found on the Geemarc webis-sit jew fuq l-imballaġġ tal-prodott.
Għal riżorsi online, żur: www.geemarc.com