
1. Introduzzjoni
This manual provides detailed instructions for the installation, operation, maintenance, and troubleshooting of the ASUS P7F-M Micro ATX Motherboard. Please read this manual thoroughly before installing or using the motherboard to ensure proper setup and functionality.
The ASUS P7F-M is designed for Intel Xeon 3400 series, Core i7, Core i5, and Core i3 processors with an LGA 1156 socket, supporting DDR3 memory and offering various expansion and connectivity options.
2. Setup u Installazzjoni
Before beginning installation, ensure your system is powered off and disconnected from the power source. Wear an anti-static wrist strap to prevent electrostatic discharge (ESD) damage to components.
2.1 Layout tal-Motherboard

Immaġni: Minn fuq għal isfel view of the ASUS P7F-M motherboard, showing the CPU socket, RAM slots, PCIe slots, and various connectors.

Immaġni: Angolata view of the ASUS P7F-M motherboard, highlighting the rear I/O panel, CPU socket, and expansion slots.
2.2 Installazzjoni tas-CPU
- Sib is-sokit tas-CPU LGA 1156 fuq il-motherboard.
- Imbotta bil-mod il-lieva tat-tagħbija 'l isfel u iġbdha lejn il-ġenb biex tiftaħ il-qafas taż-żamma tas-sokit.
- Allinja s-CPU mas-sokit bir-reqqa, filwaqt li tiżgura li t-trijangolu tad-deheb fuq is-CPU jaqbel mat-trijangolu fuq is-sokit. Tisforzax is-CPU fis-sokit.
- Close the retention frame and push the load lever back into place until it clicks.

Immaġni: Close-up view of the LGA 1156 CPU socket on the ASUS P7F-M motherboard, ready for processor installation.
2.3 Installazzjoni tal-Memorja
The motherboard supports 4x DDR3-1333/1066 DIMMs, with a maximum capacity of 16GB. It supports both ECC and non-ECC un-buffered memory.
- Iftaħ il-klipps fiż-żewġt itruf tas-slott tad-DIMM.
- Allinja l-modulu tal-memorja mas-slott, filwaqt li tiżgura li l-islott fuq il-modulu taqbel maċ-ċavetta fis-slott.
- Agħfas sew 'l isfel fuq iż-żewġt itruf tal-modulu tal-memorja sakemm il-klipps jidħlu f'posthom.
Immaġni: Close-up view of the four DDR3 DIMM slots on the ASUS P7F-M motherboard, showing their arrangement.
2.4 Installazzjoni tal-Karta tal-Espansjoni
The motherboard features:
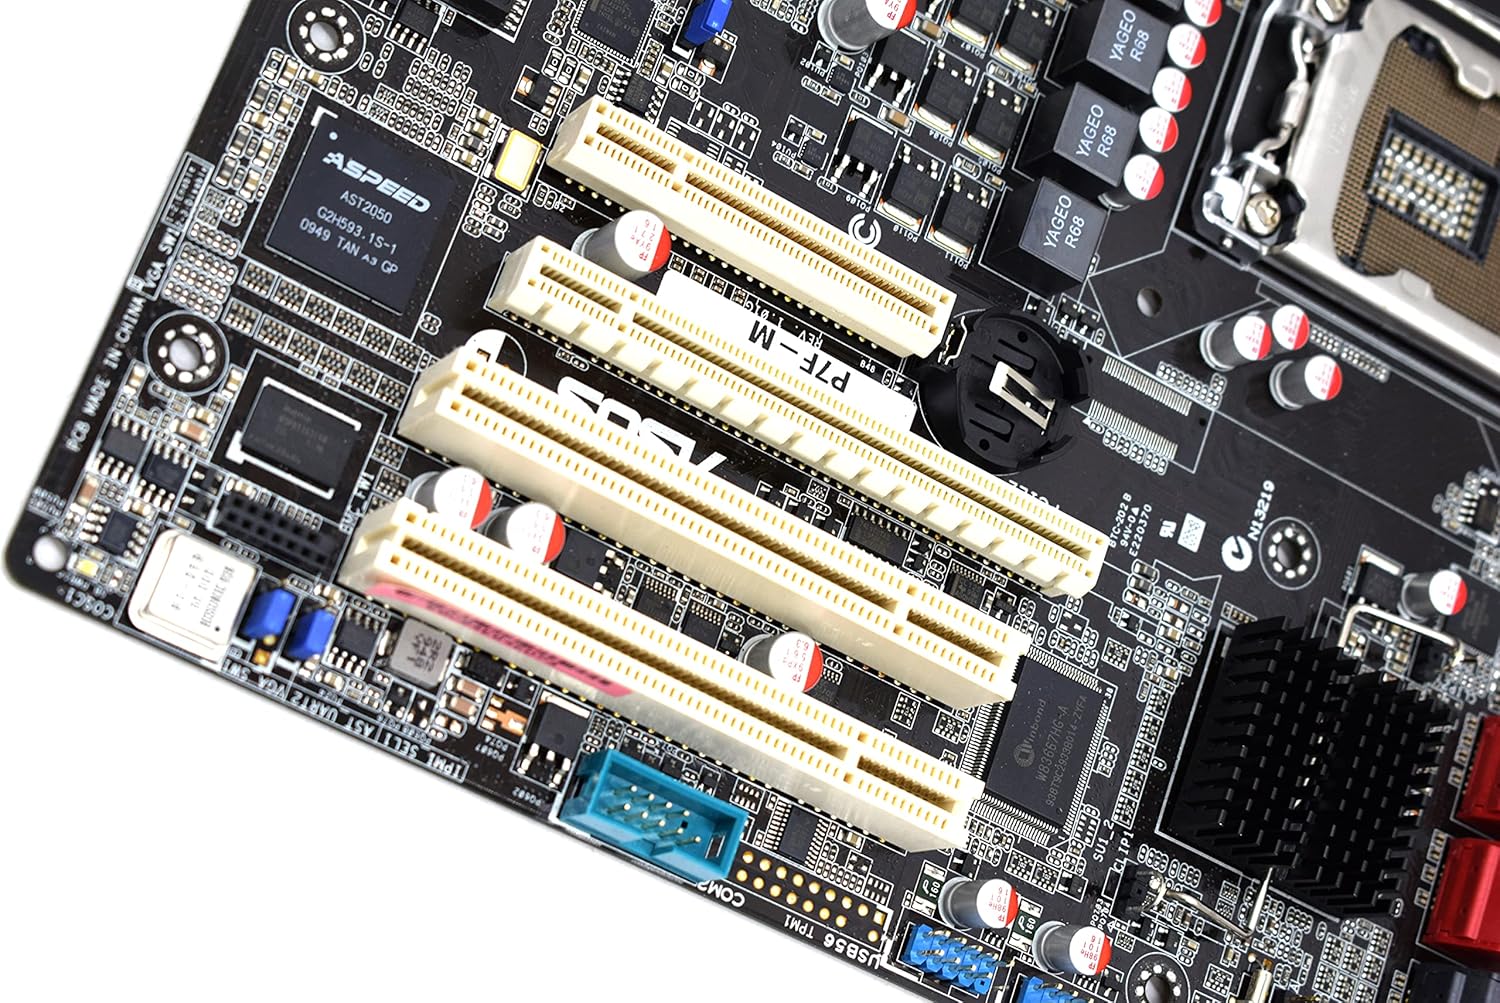
- 1x PCI-Express x16 Slot
- 1x PCI-Express x8 Slot (operates at x4)
- 2x 32bit/33MHz PCI Slots
- Select an appropriate expansion slot for your card.
- Remove the corresponding metal slot cover from your PC case.
- Allinja l-kard mas-slott u agħfas 'l isfel sew sakemm tkun f'postha sew.
- Waħħal il-kard mal-kaxxa tal-PC b'kamin.

Immaġni: Close-up view of the PCI Express and PCI expansion slots on the ASUS P7F-M motherboard.
2.5 Konnessjoni tal-Apparat tal-Ħażna
Connect your SATA storage devices (HDDs, SSDs, optical drives) to the SATA ports on the motherboard.

Immaġni: Close-up view of the SATA ports on the ASUS P7F-M motherboard, typically located near the chipset.
2.6 Konnessjonijiet tal-Enerġija
Connect the 24-pin ATX main power connector and the 8-pin CPU power connector from your power supply unit (PSU) to the corresponding ports on the motherboard.
2.7 Konnessjonijiet tal-Panew ta' wara
Connect peripherals to the rear I/O ports:
- Portijiet USB 2.0: For keyboards, mice, and other USB devices.
- Portijiet PS/2: For legacy PS/2 keyboards and mice.
- RJ45 LAN Ports: Għall-konnettività tan-netwerk.
- Port tas-Serje: For serial devices.
- Port VGA: For video output to a monitor.
3. Istruzzjonijiet Operattivi
3.1 Qawwa Inizjali
After all components are installed and connected, connect the power cable to your PSU and press the power button on your PC case. The system should initiate the Power-On Self-Test (POST).
3.2 Konfigurazzjoni tal-BIOS/UEFI
During POST, press the designated key (usually DEL or F2) to enter the BIOS setup utility. Here you can configure system settings, boot order, and monitor hardware status.
3.3 Installazzjoni tas-sewwieq
After installing your operating system, install the necessary drivers for the motherboard chipset, LAN, and any other integrated components. These drivers are typically provided on a support CD or available for download from the ASUS websit.
4. Manutenzjoni
4.1 Tindif
Naddaf l-intern tal-kompjuter tiegħek regolarment biex tevita l-akkumulazzjoni tat-trab, li jista' jwassal għal sħana żejda u ħsara fil-komponenti. Uża arja kkompressata biex tneħħi t-trab mill-fannijiet, is-sinkijiet tas-sħana, u komponenti oħra. Kun żgur li s-sistema tkun mitfija u skonnettjata qabel ma tnaddafha.
4.2 Aġġornamenti tal-BIOS
Iċċekkja l-appoġġ tal-ASUS perjodikament website for updated BIOS versions. BIOS updates can improve system stability, add support for new hardware, or fix bugs. Follow the instructions provided by ASUS carefully when performing a BIOS update to avoid system damage.
5 Issolvi l-problemi
If you encounter issues with your ASUS P7F-M motherboard, consider the following troubleshooting steps:
- Ebda Qawwa: Ensure all power cables (24-pin ATX, 8-pin CPU) are securely connected. Verify the PSU is functioning correctly.
- Ebda Display: Check that the monitor is connected to the correct video output (VGA on the motherboard or a dedicated graphics card). Reseat the graphics card and memory modules.
- Instabbiltà tas-Sistema: This can be caused by incompatible memory, insufficient power, or overheating. Verify memory compatibility and check CPU/case fan operation.
- Kodiċijiet tal-Beep tal-POST: Listen for beep codes during startup. Refer to the ASUS website or a general BIOS beep code guide to diagnose the issue.
- Component Detection Issues: Ensure all components (CPU, RAM, expansion cards, storage drives) are properly seated and connected.
For further assistance, consult the ASUS support webis-sit jew ikkuntattja l-appoġġ tekniku tagħhom.
6. Speċifikazzjonijiet
Below are the detailed technical specifications for the ASUS P7F-M Motherboard:
| Karatteristika | Speċifikazzjoni |
|---|---|
| Socket tas-CPU | LGA 1156 |
| Proċessuri Kompatibbli | Intel Quad Core Xeon 3400 series, Core i7-800, Core i5-700, Core i3 series |
| Chipset | Intel 3420 PCH Chipset |
| Slots tal-Memorja | 4x DDR3 DIMMs |
| Tip ta' Memorja | DDR3-1333/1066, Dual Channel, Un-buffered, ECC/non-ECC |
| Kapaċità Massima tal-Memorja | 16GB |
| PCI-Express x16 Slots | 1 |
| PCI-Express x8 Slots | 1 (runs in x4 mode) |
| Slots PCI | 2x 32bit/33MHz |
| Kontrollur tal-LAN | Intel 82574L Dual Port Gigabit LAN controller, 1x Management LAN |
| Portijiet USB 2.0 | 7 (2 ta' wara, 5 permezz tal-header) |
| PS/2 Ports | 2 |
| Portijiet LAN RJ45 | 3 |
| Portijiet Serjali | 2 (1 ta' wara, 1 permezz tal-header) |
| Port VGA | 1 |
| Konnettur Ewlieni tal-Enerġija | 1x 24-pin |
| Konnettur tal-Enerġija tas-CPU | 1x 8-pin |
| Fattur tal-Formola | Mikro ATX |
| Dimensjonijiet | 13.3 x 11.1 x 3.1 pulzieri (Pakkett) |
| Piż tal-oġġett | 1.5 liri |
7. Garanzija u Appoġġ
For information regarding the product warranty, please refer to the warranty card included with your motherboard or visit the official ASUS website. ASUS provides technical support and resources, including driver downloads, FAQs, and contact information, on their support portal.
Appoġġ ASUS Websit: https://www.asus.com/support/