
1. Introduzzjoni
This manual provides instructions for the installation, configuration, and operation of your ASUS RT-N13U Wireless-N Router. The RT-N13U is a versatile networking device capable of functioning as a wireless router, an access point, or a wireless repeater. It also features a USB 2.0 port for enhanced functionalities such as printer sharing, FTP hosting, network storage, and direct BitTorrent downloading.
Jekk jogħġbok aqra dan il-manwal bir-reqqa qabel ma tuża l-apparat biex tiżgura setup xieraq u prestazzjoni ottimali.
2. Prodott Aktarview
2.1 Karatteristiċi ewlenin
- EZ All-in-One Printer Sharing: Utilize the USB port to share a printer across your network.
- EZ Switch: Easily switch between Router, Repeater, and Access Point modes with a single touch.
- Enhanced Download Master: Niżżel files directly to a connected USB hard drive even when your computer is off.
- Wireless-N Connectivity: Supports 802.11b/g/n standards for high-speed wireless networking.
- 4 LAN Ports: Provides four 10/100 Mbps Ethernet ports for wired connections.
- Diagnostic and Bandwidth Management Tools: Includes Dr. Surf and EZQoS for network monitoring and quality of service management.
2.2 Kontenut tal-Pakkett
- ASUS RT-N13U Wireless-N Router
- Adapter tal-Enerġija
- Cable Ethernet
- Gwida Quick Start
- Support CD (containing user manual and utilities)
2.3 Interface tal-Hardware
Familiarize yourself with the ports, buttons, and LED indicators on your RT-N13U router.
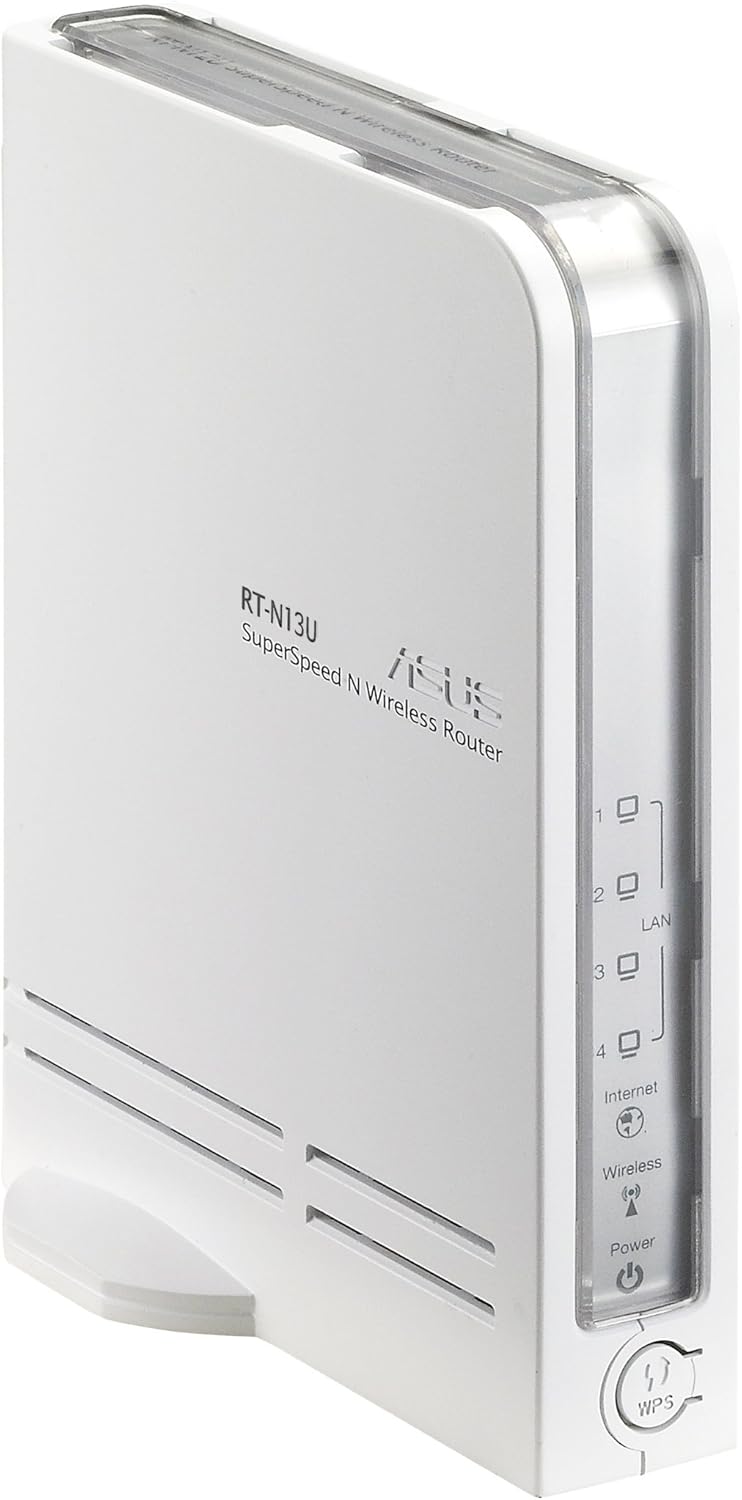
Figura 1: Quddiem u Ġenb View of the ASUS RT-N13U Router. This image shows the front panel with LED indicators for Power, Wireless, Internet, and LAN ports (1-4), along with the WPS button.

Figura 2: Wara View of the ASUS RT-N13U Router. This image displays the rear panel, including the USB 2.0 port, four LAN ports (yellow), one Internet (WAN) port (blue), and the power input port.
Indikaturi LED:
- LED tal-qawwa: Jindika l-istatus tal-enerġija. Aħdar solidu għal tħaddim normali.
- LED bla fili: Indicates wireless activity. Blinks when data is being transmitted wirelessly.
- LED tal-Internet: Indicates internet connection status. Solid green for connected, blinking for activity.
- LAN 1-4 LEDs: Indicate activity on the respective LAN ports. Solid green for connected, blinking for activity.
- WPS LED: Jindika l-istatus tas-Setup Protett tal-Wi-Fi.
Portijiet u Buttuni:
- Port USB 2.0: For connecting USB devices such as printers or external storage.
- Portijiet LAN (1-4): Connect wired devices like computers or gaming consoles.
- Port tal-Internet (WAN): Jikkonnettja mal-modem tiegħek għal aċċess għall-internet.
- Port tal-Enerġija: Jikkonnettja mal-adapter tal-enerġija inkluż.
- Buttuna WPS: Initiates Wi-Fi Protected Setup for easy wireless connection.
- Buttuna Irrisettja: (Typically a small pinhole button) Used to restore factory default settings.
- EZ Switch: A physical switch to change the device's operating mode (Router, AP, Repeater).
3. Setup
3.1 Konnessjoni Inizjali tal-Ħardwer
- Connect the power adapter to the router's Power port and plug it into a power outlet.
- Connect one end of the Ethernet cable to the Internet (WAN) port of the RT-N13U and the other end to your modem's Ethernet port.
- (Optional) For initial configuration, connect your computer directly to one of the LAN ports (1-4) on the router using an Ethernet cable.
- Power on your modem, then power on the RT-N13U router. Wait for the Power, Internet, and Wireless LEDs to stabilize.
3.2 Configuration Modes
The RT-N13U supports three operating modes, selectable via the EZ Switch:
- Modalità Router: The default mode, where the device acts as a gateway for your network, providing internet access and managing local network traffic.
- Modalità Punt ta' Aċċess (AP): Extends an existing wired network by adding wireless connectivity. In this mode, internet features are typically disabled, and the device acts as a wireless hub.
- Modalità Ripetitur: Extends the range of an existing wireless network by receiving and re-transmitting the wireless signal.
Select the desired mode using the physical EZ Switch on the router before proceeding with software configuration.
3.3 Web Aċċess għall-Interface
- Iftaħ a web browser (e.g., Chrome, Firefox, or IE8/Edge; IE9 beta may have compatibility issues).
- Fil-bar tal-indirizzi, ittajpja l-indirizz IP awtomatiku tar-router (ġeneralment
192.168.1.1orrouter.asus.com) u agħfas Enter. - Daħħal l-isem tal-utent u l-password awtomatiċi (tipikament
adminfor both). Refer to the label on the bottom of your router if these defaults do not work. - Follow the on-screen setup wizard.
3.4 Internet Connection Setup (Router Mode)
If the EZ UI setup feature does not automatically configure your internet connection, manual steps may be required, especially for certain Internet Service Providers (ISPs).
- Iġbor Informazzjoni:
- Your computer's MAC address (Physical Address). On Windows, open Command Prompt and type
ipconfig /all. - Your ISP's DNS server addresses. If connected via Ethernet, use
ipconfig /allto find "DNS Servers".
- Your computer's MAC address (Physical Address). On Windows, open Command Prompt and type
- Access Network Map: Fir-router web interface, navigate to the "Network Map" or "EZ-UI" section.
- Konfigurazzjoni Manwali: If the connection fails, the system may prompt for manual configuration.
- Uża l- Klonu MAC feature. Some ISPs tie your internet service to a specific MAC address. Cloning your computer's MAC address to the router can resolve connectivity issues.
- Manually enter your ISP's DNS server addresses if required.
- Apply Settings and Restart: Apply the new settings. The router will restart. Your computer may temporarily lose connection. Reconnect to the router.
- Power Cycle (If Needed): If the internet connection is still not established:
- Power off the wireless router.
- Power off your modem/ISP's box.
- Stenna għal 5 minuti.
- First, power on the modem/ISP's box and wait for it to fully boot.
- Then, power on the ASUS RT-N13U router.
- Check for internet connectivity.
Note: For optimal wireless performance, ensure the wireless radio is set to "N only" mode in the router's settings if all your devices support 802.11n.
4. Operazzjoni
4.1 Apparat li jgħaqqad
Konnessjonijiet bil-fili:
Connect Ethernet-enabled devices (e.g., desktop computers, smart TVs, gaming consoles) to the yellow LAN ports (1-4) on the back of the router using Ethernet cables.
Konnessjonijiet Wireless:
- Fuq it-tagħmir mingħajr fili tiegħek (laptop, smartphone, tablet), fittex netwerks Wi-Fi disponibbli.
- Select the network name (SSID) of your ASUS RT-N13U (default SSID is usually "ASUS" or "ASUS_RT-N13U").
- Enter the network security key (password). This can be found on a label on the router or in the router's web interface.
- Alternatively, press the WPS button on the router and then activate WPS on your wireless device within two minutes for a quick connection.
4.2 USB Features
The USB 2.0 port on the RT-N13U provides additional functionalities:
Kondiviżjoni tal-Printer:
Connect a compatible USB printer to the USB 2.0 port. Configure printer sharing through the router's web interface to allow multiple computers on your network to print to it.
Download Master:
Connect a USB storage device (e.g., external hard drive, flash drive) to the USB 2.0 port. The Download Master feature allows you to initiate downloads (including BitTorrent) directly to the connected storage device, even when your computer is turned off. This feature typically works only when the router is in Router Mode.
Note: Ensure the USB storage device is formatted correctly and recognized by the router. For BitTorrent downloads, you may need to provide the exact URL location for the downloader to function properly.
5. Manutenzjoni
5.1 Aġġornamenti tal-Firmware
Regularly updating the router's firmware is crucial for performance improvements, security enhancements, and bug fixes. Visit the official ASUS support website for the RT-N13U model to download the latest firmware. Follow the instructions provided with the firmware update package carefully to avoid damaging the device.
Note: Firmware updates can resolve many common issues and improve compatibility with various devices and services.
5.2 Ir-restawr ta' Defaults tal-Fabbrika
If you encounter persistent issues or forget your login credentials, you can restore the router to its factory default settings. This will erase all custom configurations.
- With the router powered on, locate the Reset button (often a small pinhole) on the device.
- Use a paperclip or a similar pointed object to press and hold the Reset button for approximately 5-10 seconds.
- Release the button when the Power LED starts blinking rapidly or all LEDs briefly flash.
- The router will restart with factory default settings. You will need to reconfigure it from scratch.
6 Issolvi l-problemi
6.1 Kwistjonijiet Komuni u Soluzzjonijiet
- Ebda Konnessjoni tal-Internet:
- Check all cable connections (modem to router WAN port, router to computer LAN port).
- Perform a power cycle on both your modem and router (unplug, wait 5 minutes, plug modem first, then router).
- Verify your ISP settings in the router's web interface, especially if MAC cloning or specific DNS servers are required.
- Ensure the router is in the correct operating mode (Router Mode for internet access).
- Ma nistax naċċessa r-Router Web Interface:
- Ensure your computer is connected to the router (wired or wirelessly).
- Verify the IP address (e.g.,
192.168.1.1) is correct. - Ipprova differenti web browser.
- Iddiżattiva temporanjament kwalunkwe firewall jew softwer antivirus fuq il-kompjuter tiegħek.
- Jekk insejt il-password, wettaq reset tal-fabbrika (ara t-Taqsima 5.2).
- Slow Wireless Speed or Dropped Connections:
- Kun żgur li l-firmware tar-router huwa aġġornat.
- Check for wireless interference from other devices (cordless phones, microwaves).
- Adjust the wireless channel in the router settings.
- Position the router in a central location, away from obstructions.
- If all devices support 802.11n, set the wireless mode to "N only" for higher speeds.
- Apparat USB Mhux Rikonoxxut:
- Ensure the USB device is properly connected and powered (if external power is required).
- Iċċekkja r-router web interface for USB device status and configuration.
- Verify compatibility of the USB device with the router.
- Ensure the router is in Router Mode for USB features like Download Master.
6.2 Tifsira tal-Indikatur LED
| Indikatur LED | Status | Deskrizzjoni |
|---|---|---|
| Qawwa | Aħdar Solidu | L-apparat huwa mixgħul u qed jaħdem normalment. |
| Mitfi | L-apparat huwa mitfi. | |
| Wireless | Aħdar Solidu | Il-funzjoni bla fili hija attivata. |
| Teptip Aħdar | Wireless data transmission is active. | |
| Internet | Aħdar Solidu | Konnessi mal-Internet. |
| Teptip Aħdar | Internet data transmission is active. | |
| Mitfi | Ebda konnessjoni tal-Internet. | |
| LAN 1-4 | Aħdar Solidu | Apparat huwa konness mal-port LAN korrispondenti. |
| Teptip Aħdar | Data transmission is active on the corresponding LAN port. | |
| WPS | Teptip | WPS connection process is active. |
7. Speċifikazzjonijiet
| Karatteristika | Dettall |
|---|---|
| Isem tal-Mudell | RT-N13U |
| Standard Wireless | 802.11b/g/n |
| Banda ta' Frekwenza | Single Band (2.4 GHz) |
| Teknoloġija tal-Konnettività | Mingħajr fili, Ethernet |
| Portijiet Ethernet | 4 x 10/100 Mbps LAN, 1 x 10/100 Mbps WAN |
| Port USB | 1 x USB 2.0 |
| Tip ta' Antenna | Intern |
| Karatteristiċi Speċjali | Access Point Mode, Repeater Mode, WPS, Printer Sharing, Download Master |
| Dimensjonijiet tal-Prodott | 10 x 8.88 x 3.75 pulzieri |
| Piż tal-oġġett | 5.3 uqija (madwar 150 Gramma) |
| Manifattur | ASUS |
| L-Ewwel Data Disponibbli | 28 ta’ Settembru, 2009 |
8. Informazzjoni dwar is-Sigurtà
- Use only the power adapter provided with the device. Using an incompatible adapter may damage the device and void your warranty.
- Tesponix l-apparat għall-ilma, umdità, jew temperaturi estremi.
- Poġġi l-apparat f'żona b'ventilazzjoni tajba biex tevita sħana żejda.
- Tiftaħx l-apparat casing. Servicing should only be performed by authorized personnel.
- Żomm l-apparat 'il bogħod minn kampi elettromanjetiċi qawwija.
9. Garanzija u Appoġġ
For warranty information, technical support, and further assistance, please visit the official ASUS support website or contact ASUS customer service. Details can typically be found on the ASUS webis-sit jew fid-dokumentazzjoni inkluża mal-prodott tiegħek.
Appoġġ ASUS Websit: www.asus.com/support/