1. Introduzzjoni
This manual provides comprehensive instructions for the setup, operation, and maintenance of your KitVision 7-inch Digital Photo Frame, model DPF7BKK. Please read this manual thoroughly before using the device to ensure proper functionality and longevity.

Figura 1: Quddiem view of the KitVision 7-inch Digital Photo Frame. The frame is silver with a black bezel, displaying a vibrant image of a person holding a child on a beach.
2. Kontenut tal-Pakkett
Iċċekkja li l-oġġetti kollha elenkati hawn taħt huma preżenti fil-pakkett tiegħek:
- KitVision 7-inch Digital Photo Frame (DPF7BKK)
- Adapter tal-Qawwa AC
- Stand li jista 'jinqala'
- Manwal għall-Utent (dan id-dokument)

Figure 2: The product packaging for the KitVision 7-inch Digital Photo Frame. The box features a blue background with wave patterns and an image of the digital photo frame displaying a beach scene.
3. Prodott Aktarview
3.1. Rear Panel and Controls

Figura 3: Wara view of the digital photo frame. Visible features include the USB port, SD/MMC/MS card slot, DC power input, control buttons (ENTER, arrows, MENU, STANDBY), and a detachable stand.
- Port USB: Għall-konnessjoni ta' flash drives tal-USB.
- SD/MMC/MS Card Slot: Għall-inseriment ta' memory cards kompatibbli.
- Input DC: Power connection port for the AC adapter.
- Buttuni tal-Kontroll:
- Daħħal: Jikkonferma l-għażla.
- < / > (Left/Right Arrows): Navigates through menus and images.
- ^ / v (Up/Down Arrows): Jinnaviga permezz tal-menus u l-għażliet.
- MENU: Jaċċessa l-menu prinċipali.
- STANDBY: Powers the frame on or off.
- Stand li jista' jinqala': Allows for tabletop placement in landscape or portrait orientation.
- Toqba għall-Immuntar mal-Ħajt: For mounting the frame on a wall.
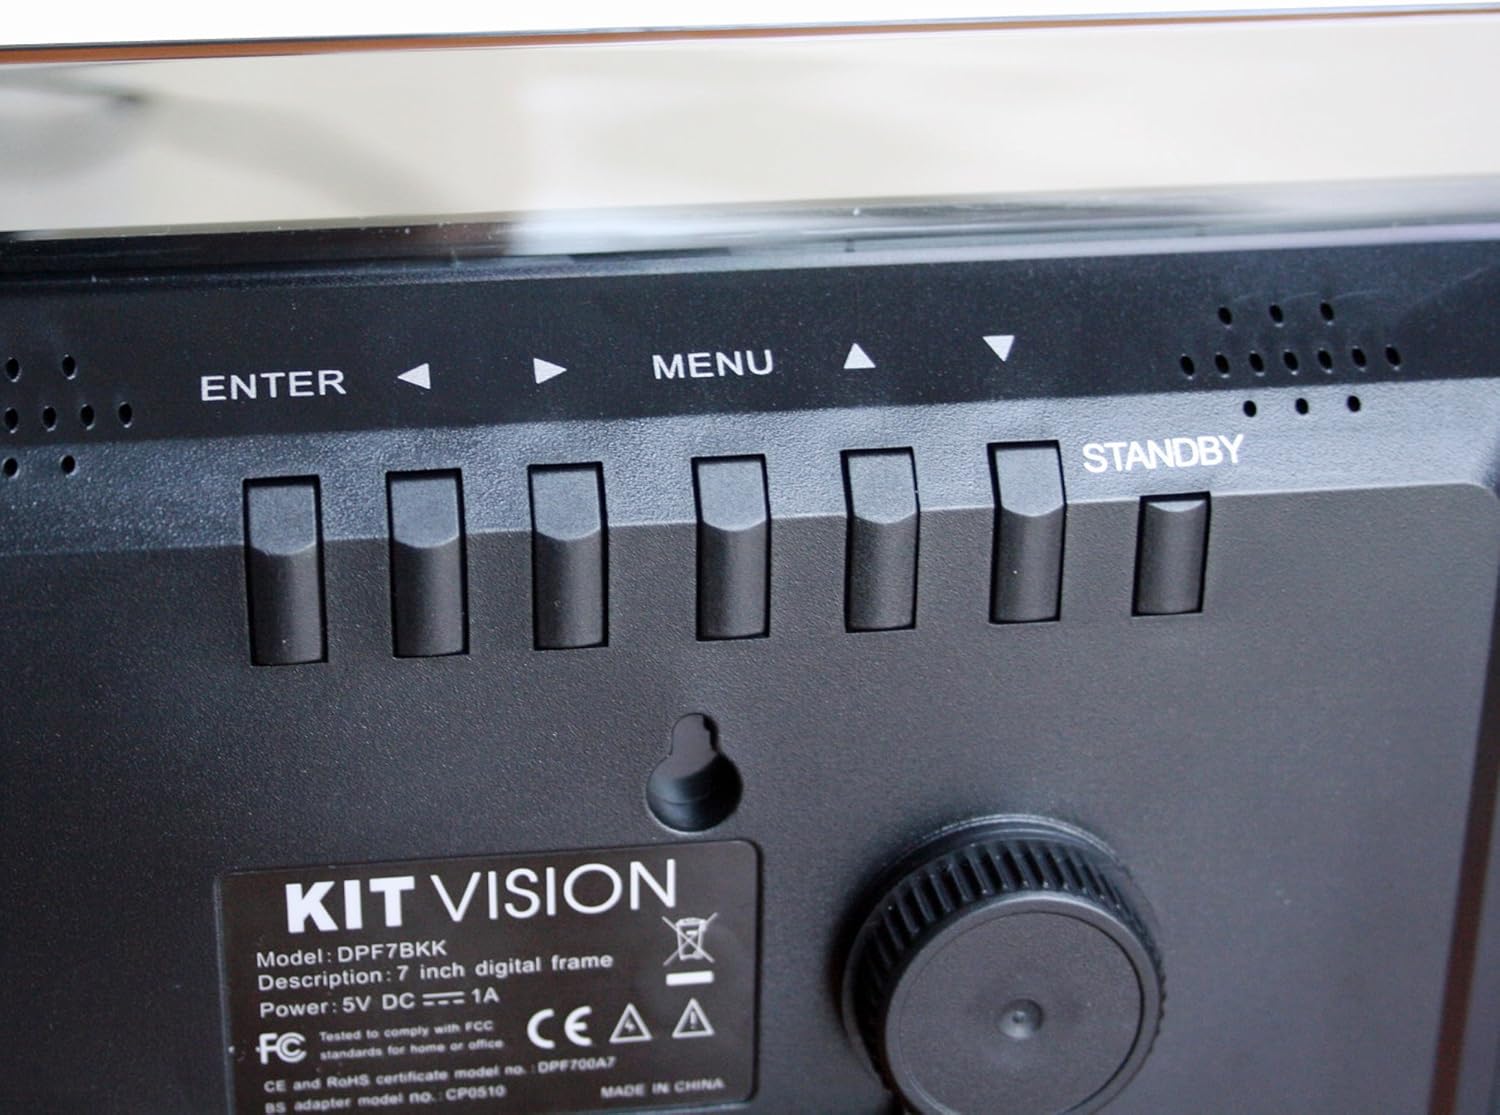
Figura 4: Close-up view of the control buttons and product label on the rear of the digital photo frame. The label clearly shows "KITVISION", "Model: DPF7BKK", and power specifications.
4. Setup
4.1. Twaħħil tal-Istand
- Locate the detachable stand in the package.
- Insert the stand's peg into the designated hole on the rear of the photo frame.
- Rotate the stand to secure it in place and adjust the angle for optimal viewing. The stand supports both landscape and portrait orientations.
4.2. Konnessjoni tal-Enerġija
- Connect the AC power adapter to the DC input port on the rear of the frame.
- Ipplaggja t-tarf l-ieħor tal-adapter tal-enerġija f'sokit elettriku standard.
- The frame will typically power on automatically or can be turned on using the STANDBY button.
4.3. Inserting a Memory Card or USB Drive
The frame supports SD, MMC, MS memory cards, and USB flash drives. Ensure your photos are in a compatible format (e.g., JPEG).
- Carefully insert your memory card into the SD/MMC/MS slot or your USB flash drive into the USB port.
- Ensure the card or drive is inserted correctly and fully seated. Do not force it.
- The frame should automatically detect the storage device and begin displaying photos, or prompt you to select a source.
5. Istruzzjonijiet Operattivi
5.1. Navigazzjoni Bażika
- Uża l- </> (Left/Right) and ^ / v (Up/Down) arrow buttons to navigate through menus and select options.
- Agħfas il- DĦUL button to confirm a selection or open a sub-menu.
- Agħfas il- MENU button to return to the previous menu or access the main menu from a slideshow.
- Agħfas u żomm il- STANDBY button to power the frame off or on.
5.2. Viewritratti
Once a memory card or USB drive is inserted, the frame will typically start a slideshow automatically. If not, navigate to the "Photo" or "Slideshow" option in the main menu and press DĦUL.
5.3. Issettjar tal-Wirja tal-Islajds
To customize your slideshow:
- Agħfas il- MENU buttuna biex taċċessa l-menu prinċipali.
- Navigate to "Settings" or "Slideshow Options" using the arrow buttons and press DĦUL.
- Adjust settings such as:
- Ħin tal-Wiri: Duration each photo is shown.
- Effett ta' Transizzjoni: How photos change (e.g., fade, wipe).
- Irrepeti Modalità: Loop all photos or play once.
- Photo Order: Sequential or random.
- Agħfas DĦUL biex tikkonferma l-bidliet u MENU għall-ħruġ.
6. Manutenzjoni
6.1. Tindif tal-Qafas
- Dejjem skonnettja l-adapter tal-enerġija qabel it-tindif.
- Uża drapp artab, niexef u mingħajr suf biex timsaħ bil-mod l-iskrin u l-qafas.
- Għal marki iebsa fuq l-iskrin, aqta’ ħafifampLaħlaħ id-drapp bl-ilma jew b'soluzzjoni tat-tindif li ma tagħmilx ħsara lill-iskrin. Tisprejjax likwidu direttament fuq l-iskrin.
- Evita li tuża prodotti tat-tindif li joborxu, solventi, jew soluzzjonijiet ibbażati fuq l-alkoħol, għax dawn jistgħu jagħmlu ħsara lill-wiċċ.
6.2. Ħażna
- When not in use for extended periods, store the digital photo frame in a cool, dry place, away from direct sunlight and extreme temperatures.
- It is recommended to store the frame in its original packaging to protect it from dust and physical damage.
7 Issolvi l-problemi
| Problema | Kawża Possibbli | Soluzzjoni |
|---|---|---|
| Il-qafas ma jixgħelx. | No power, faulty adapter, or STANDBY button not pressed. | Ensure power adapter is securely connected to both the frame and a working electrical outlet. Press the STANDBY button. Try a different outlet. |
| L-ebda immaġni murija. | No memory card/USB, incompatible file format, or card/USB not inserted correctly. | Insert a memory card or USB drive with compatible image files (JPEG). Ensure it is fully seated. Check if the frame is set to the correct source input in the menu. |
| Images appear distorted or low quality. | Low resolution images, damaged memory card/USB, or screen issue. | Use higher resolution images. Try a different memory card or USB drive. Clean the screen. |
| Il-buttuni ma jirrispondux. | Problema temporanju tas-softwer. | Disconnect the power adapter, wait 10 seconds, then reconnect it to reset the device. |
8. Speċifikazzjonijiet
| Numru tal-Mudell | DPF7BKK |
| Daqs tal-Iskrin | 7 Pulzier |
| Riżoluzzjoni | WXGA |
| Dimensjonijiet tal-Prodott | 9.06 x 6.5 x 1.26 pulzieri |
| Piż tal-oġġett | 0.012 uqija |
| Teknoloġija tal-Konnettività | USB |
| Sors tal-Enerġija | Corded Electric (5V DC === 1A) |
| Kards tal-Memorja Appoġġjati | SD, MMC, MS |
| Formati ta 'Immaġni Appoġġjati | JPEG (common format, specific list not provided in input) |
9. Garanzija u Appoġġ
For warranty information and technical support, please refer to the documentation provided at the time of purchase or contact KitVision customer service. Specific warranty terms may vary by region and retailer.