
ASUS XONAR_DX/XD/A / 90-YAA060-1UAN00Z
ASUS Xonar DX 7.1 Channel Sound Card User Manual
Model: XONAR_DX/XD/A / 90-YAA060-1UAN00Z
Introduzzjoni
This manual provides comprehensive instructions for the installation, operation, and maintenance of your ASUS Xonar DX PCI-Express x1 7.1 Channel Sound Card. The Xonar DX is designed to enhance your audio experience with high-fidelity sound output and advanced processing capabilities. Please read this manual thoroughly before installation and use to ensure optimal performance and longevity of your device.
X'hemm fil-Kaxxa
Malli tiftaħ il-pakkett, ivverifika li l-komponenti kollha huma preżenti:
- XONAR DX ASUS Xonar DX PCI Express Sound Card
- Driver CD (Note: Latest drivers should be downloaded from the ASUS support website for optimal compatibility and performance.)
- Molex to 4-pin power adapter cable (if included)
- Pro baxxfile bracket (if included for small form factor PCs)
Prodott Overview
Familiarize yourself with the various components and connectors of the ASUS Xonar DX sound card.

Figura 1: Minn fuq għal isfel view of the ASUS Xonar DX sound card. This image highlights the overall layout of the card, including the main audio processor, various capacitors, and the PCI-Express x1 interface at the bottom, along with the 4-pin power connector at the top right.

Figura 2: Angolat view of the ASUS Xonar DX sound card. This perspective provides a clearer look at the rear I/O panel, featuring multiple gold-plated audio jacks for 7.1 channel output and input, as well as the standard PCI bracket for secure installation in a computer case.
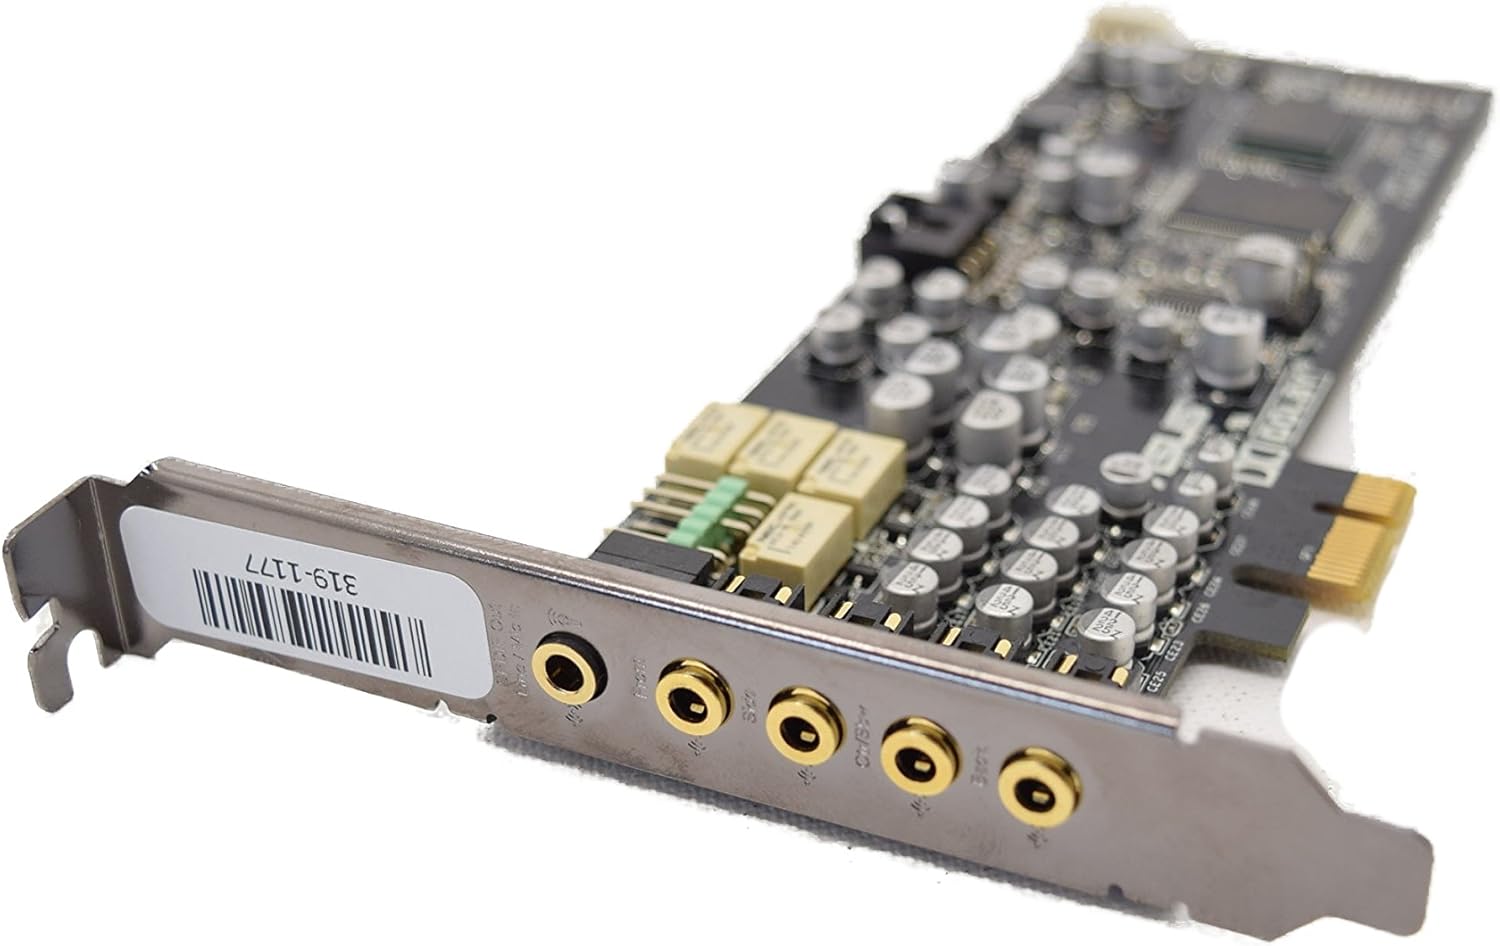
Figura 3: Close-up of the ASUS Xonar DX sound card's rear panel connectors. This detailed view shows the individual audio jacks, typically color-coded or labeled for specific channels (e.g., front, rear, center/subwoofer, side, and line-in/microphone), allowing for precise connection of speakers or headphones.

Figura 4: View of the ASUS Xonar DX sound card from the front. This image highlights the PCI-Express x1 connector, which interfaces with the motherboard, and also shows internal headers such as the front panel audio connector, allowing for connection to the PC case's front audio ports.

Figura 5: Angolat view of the ASUS Xonar DX sound card, focusing on the power connector. This image clearly displays the 4-pin power connector (typically a floppy drive power connector or requiring a Molex adapter) necessary to provide stable power to the sound card, ensuring optimal audio performance.
Setup u Installazzjoni
Rekwiżiti tas-Sistema:
- Sistema Operattiva: Microsoft Windows Vista (32 or 64bit), XP (32 or 64bit), or MCE2005. (Note: Newer Windows versions may require unofficial or community-developed drivers for full functionality.)
- CPU: Intel Pentium 4 1.4GHz or AMD Athlon 1400 CPU or faster.
- PCI Express Slot: One PCI Express 1.0 (or higher) compatible slot (x1, x4, x8, or x16).
- Provvista tal-Enerġija: One available 4-pin power cable from your PC's power supply unit. An adapter may be required if only Molex connectors are available.
- Drive Ottiku: CD-ROM drive (or DVD-ROM drive) for software installation (initial driver installation).
- Output Awdjo: High-quality headphones, powered analog speakers, or a home theater system.
Installazzjoni tal-ħardwer:
- Ipprepara s-Sistema Tiegħek:
- Itfi l-kompjuter tiegħek u aqla’ l-korda tal-enerġija mis-sokit tal-ħajt.
- Iftaħ il-każ tal-kompjuter tiegħek.
- (Mhux obbligatorju iżda Rakkomandat) Disable your motherboard's integrated audio in the BIOS/UEFI settings to prevent conflicts.
- Install the Sound Card:
- Sib slott PCI Express x1 disponibbli fuq il-motherboard tiegħek.
- Carefully insert the ASUS Xonar DX into the slot, ensuring it is fully seated.
- Secure the card with a screw to the computer case's expansion slot.
- Qabbad l-Enerġija:
- Connect an available 4-pin power cable from your power supply to the corresponding connector on the sound card. If your power supply only has Molex connectors, use the provided Molex to 4-pin adapter cable. Ensure a secure connection to provide stable power to the card.
- Agħlaq il-Kaxxa u Ixgħelha:
- Agħlaq il-kaxxa tal-kompjuter tiegħek u erġa' qabbad il-korda tal-enerġija.
- Ixgħel il-kompjuter tiegħek.
Installazzjoni tas-Softwer:
- Initial Driver Installation:
- Upon booting into Windows, the operating system may attempt to install generic drivers. Cancel any automatic driver installation prompts.
- Insert the driver CD that came with your sound card. Follow the on-screen instructions to install the drivers and utility software.
- Update Drivers (Recommended):
- For the best performance and compatibility, especially with newer operating systems, it is highly recommended to download and install the latest drivers directly from the official ASUS support websit. Żjara Appoġġ ASUS and search for "Xonar DX".
- Nota: Some users have reported success with community-developed "Uni Xonar" drivers for improved stability and features on Windows 7/8/10/11. Research these options if official drivers present issues.
- Ikkonfigura s-Settings tal-Awdjo:
- After driver installation, open the ASUS Xonar Audio Center (or similar control panel) from your system tray or Start Menu.
- Configure your speaker setup (e.g., 2-channel, 5.1, 7.1), enable desired audio effects (Dolby Digital Live, DTS Connect), and adjust equalizer settings to your preference.
Tħaddim tal-Karta tas-Sound
The ASUS Xonar DX provides a rich audio experience through its advanced hardware and software features.
Key Features and Capabilities:
- Proċessur Awdjo: ASUS AV100 High-Definition Sound Processor (Max. 192KHz/24bit).
- Digital-to-Analog Converters (DACs):
- 1x Cirrus-Logic CS4398 for Front-Out (120dB SNR, Max. 192kHz/24bit).
- 1x Cirrus-Logic CS4362A for other 6 channels.
- Konvertitur minn Analogu għal Diġitali (ADC): 1x Cirrus-Logic CS5361 (114dB SNR, Max. 192kHz/24bit) for analog inputs.
- Proporzjon tas-sinjal għall-istorbju (SNR):
- Output (A-Weighted): 116dB for front-out, 112dB for other channels.
- Input (A-Weighted): 112 dB.
- Total Harmonic Distortion + Noise (THD+N) at 1kHz:
- Output: 0.00056% (-105dB) for Front-out.
- Input: 0.0004% (-108dB) for Line-in.
- Frequency Response (-3dB, 24-bit/96kHz input): <10Hz to 48KHz.
- Output/Input Full-Scale Voltage: 2 Vrms (5.65 Vp-p).
Using the Audio Center Software:
The Xonar Audio Center provides a user-friendly interface to control various aspects of your sound card:
- Panel Prinċipali: Select output mode (Headphone, 2-channel, 4-channel, 5.1, 7.1), sample rate, and activate Dolby/DTS technologies.
- Mixer: Adjust volume levels for playback, recording, and various input sources.
- Effett: Apply environmental effects, equalizer presets, or customize your own EQ settings.
- Karaoke: Features for microphone echo and key shifting.
- FlexBass: Manage bass redirection and crossover frequencies for subwoofer integration.
Manutenzjoni
To ensure the longevity and optimal performance of your ASUS Xonar DX sound card, follow these simple maintenance guidelines:
- Żommha Nadif: Periodically open your computer case and gently clean any dust accumulation on the sound card using compressed air. Dust can impede airflow and lead to overheating or component degradation.
- Konnessjonijiet sikuri: Ensure all cables, especially the 4-pin power connector and audio cables, are securely seated. Loose connections can lead to intermittent sound issues or system instability.
- Aġġornamenti tas-sewwieq: Iċċekkja regolarment l-appoġġ uffiċjali tal-ASUS website for updated drivers. Keeping your drivers current can resolve bugs, improve performance, and ensure compatibility with new software or operating system updates.
- Kundizzjonijiet Ambjentali: Operate the sound card within recommended temperature and humidity ranges. Avoid extreme temperatures or high humidity environments.
Issolvi l-problemi
If you encounter issues with your ASUS Xonar DX sound card, refer to the following common troubleshooting steps:
- Ebda Ħsejjes tal-Ħsejjes:
- Verify that the sound card is properly seated in its PCI Express slot and the 4-pin power connector is securely attached.
- Check speaker/headphone connections to the correct audio jacks on the sound card.
- Ensure volume levels are not muted in Windows or the Xonar Audio Center.
- Confirm that the Xonar DX is set as the default playback device in Windows Sound settings.
- Erġa' installa jew aġġorna s-sewwieqa tal-kard tal-ħoss.
- Ħoss Mgħawġ jew Crackling:
- This can often be caused by driver issues. Ensure you have the latest stable drivers installed.
- Check for electrical interference. Ensure the 4-pin power connector is providing stable power.
- Disable any integrated audio on your motherboard in the BIOS/UEFI to prevent conflicts.
- Test with different audio sources or speakers/headphones to isolate the problem.
- Driver Installation Issues / Blue Screens:
- Ensure you have completely uninstalled any previous audio drivers (especially integrated audio) before installing Xonar drivers.
- Download drivers directly from the ASUS support website. Avoid using outdated drivers from the included CD.
- For Windows 7/8/10/11, consider searching for community-supported "Uni Xonar" drivers, which often provide better compatibility and stability than official legacy drivers.
- Front Panel Audio Not Working:
- Ensure the front panel audio cable from your PC case is correctly connected to the corresponding header on the Xonar DX card.
- Check settings in the Xonar Audio Center to ensure front panel detection is enabled or manually switch output to front panel if necessary.
For more detailed troubleshooting, refer to the official User Manual PDF available online: ASUS Xonar DX User Manual (PDF).
Speċifikazzjonijiet
| Karatteristika | Dettall |
|---|---|
| Dimensjonijiet tal-Prodott | 2.71 x 6.6 x 2 pulzieri |
| Piż tal-oġġett | 1.03 liri |
| Numru tal-Mudell tal-Oġġett | XONAR_DX/XD/A / 90-YAA060-1UAN00Z |
| Brand | ASUS |
| Apparati Kompatibbli | Kompjuter Personali |
| Interface tal-Ħardwer | PCI-Express x1 |
| Modalità tal-Ħruġ tal-Awdjo | 7.1 Channel Surround |
| Pjattaforma | Windows |
| Proċessur Awdjo | ASUS AV100 High-Definition Sound Processor (Max. 192KHz/24bit) |
| DAC (Front-Out) | 1x Cirrus-Logic CS4398 (120dB SNR, Max. 192kHz/24bit) |
| DAC (Other Channels) | 1x Cirrus-Logic CS4362A |
| ADC (Analog Inputs) | 1x Cirrus-Logic CS5361 (114dB SNR, Max. 192kHz/24bit) |
| Output SNR (A-Weighted) | 116dB (front-out), 112dB (other channels) |
| Input SNR (A-Weighted) | 112 dB |
| Output THD+N (1kHz) | 0.00056% (-105dB) for Front-out |
| Input THD+N (1kHz) | 0.0004% (-108dB) for Line-in |
| Rispons ta' Frekwenza | <10Hz to 48KHz (-3dB, 24-bit/96kHz input) |
| Skala Sħiħa Voltage | 2 Vrms (5.65 Vp-p) |
Informazzjoni dwar Garanzija
ASUS products are manufactured to the highest quality standards. For specific warranty terms and conditions applicable to your ASUS Xonar DX sound card, please refer to the warranty card included with your product or visit the official ASUS websit. Il-kopertura tal-garanzija tipikament tinkludi difetti fil-materjali u x-xogħol taħt użu normali.
Appoġġ
Għal appoġġ tekniku, downloads ta' sewwieqa, FAQs, u aktar assistenza, jekk jogħġbok żur is-sit uffiċjali tal-appoġġ tal-ASUS websit:
You can also refer to the comprehensive User Manual (PDF) for detailed information:
Ask a question about this manual
Ask about setup, troubleshooting, compatibility, parts, safety, or missing instructions. Manuals+ will review the question and use this page’s manual context to help answer it.