1. Introduzzjoni
The TC Electronic Desktop Konnekt 6 is a high-quality 24-bit/192kHz Firewire desktop audio interface designed for recording instruments and vocals into your Mac or PC. It offers a compact design with essential monitoring and input/output controls readily accessible, allowing users to focus on their creative process.
This manual provides detailed instructions for setting up, operating, maintaining, and troubleshooting your Desktop Konnekt 6 to ensure optimal performance and longevity.
2. Karatteristiċi ewlenin
- Monitor Control: Features a large volume knob, high-resolution meter, tracking reverb level control, direct monitor control with input/DAW control, DIM switch, and instant scene recall.
- IMPACT™ Mic Preamp and I/O: Equipped with a high-quality IMPACT™ mic preamp with 48V phantom power, versatile input configurations (mic + instr, instr + instr, stereo line), balanced stereo outputs, true Hi-Z guitar inputs, and a headphone output with separate level control.
- M40 Studio Reverb: Includes a studio-grade reverb powered by AlgoFlex™ technology, offering Hall, Room, and Plate algorithms. Available as part of the monitor mix for tracking and as a VST/AU compatible plug-in.
- Integrazzjoni tas-Software: Bundled with Cubase LE4 for immediate recording capabilities.
- Konnettività: FireWire 1394, bus powered, with DICE™ digital interface chip and JetPLL™ jitter elimination technology.
- Awdjo b'Riżoluzzjoni Għolja: Supports 24-bit/192 kHz samprati tal-linarda.
3. Gwida ta' Setup
3.1 Spakkjar u Spezzjoni
Carefully remove the Desktop Konnekt 6 from its packaging. Verify that all components are present: the Desktop Konnekt 6 unit, Firewire cable, external power supply, and software installation disc (Cubase LE4).
3.2 Konnessjonijiet tal-Hardware
- Konnessjoni tal-Enerġija: Connect the included external power supply to the 12V power input on the rear of the unit. Alternatively, the unit can be bus-powered via the Firewire connection if your computer's Firewire port provides sufficient power.
- Firewire Connection: Connect the Desktop Konnekt 6 to your computer using a Firewire 1394 cable. Ensure a secure connection.
- Riżultat tal-Monitoraġġ: Connect your studio monitors to the balanced LEFT and RIGHT monitor outputs on the rear panel using appropriate cables.
- Headphones: Plug your headphones into the dedicated 'PHONES OUT' jack on the rear panel.
- Inputs:
- Mikrofonu: Connect a microphone to the 'MIC' XLR input.
- Line/Instrument: Connect instruments (guitars, basses) or line-level devices to the 'LINE/INST' 1/4" inputs. The unit features true Hi-Z inputs for direct guitar recording.
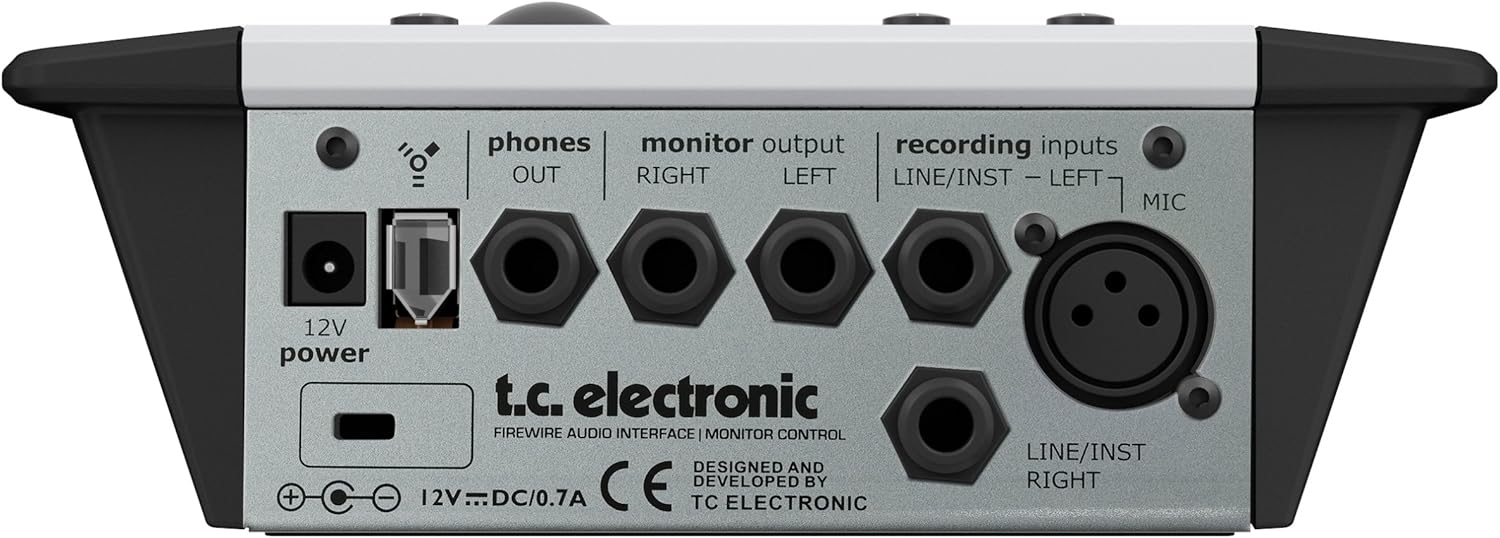
Figure 3.2.1: Rear panel connections of the Desktop Konnekt 6, illustrating power, Firewire, monitor outputs, headphone output, and various input types including XLR for microphone and 1/4" jacks for line/instrument.
3.3 Installazzjoni tas-Softwer
Insert the provided software installation disc into your computer's optical drive. Follow the on-screen instructions to install the necessary drivers for your operating system (Windows or macOS) and the bundled Cubase LE4 software. Ensure your operating system is up-to-date for best compatibility.
4. Istruzzjonijiet Operattivi
4.1 Front Panel Overview

Figura 4.1.1: Fuq view of the Desktop Konnekt 6, displaying the input section, monitor section with large volume knob, high-resolution meter, and scene selection buttons.
4.2 Taqsima tal-Input
- Gain Knobs (Input 1 & 2): Adjust the input level for connected microphones or instruments. Monitor the high-resolution meter to prevent clipping.
- Għażla tax-Xena: Use the 'SCENE 1', 'SCENE 2', 'SCENE 3' buttons to quickly recall predefined input configurations. Default presets include Microphone and Guitar, Two Guitars/Basses, and Stereo Line Signal.
- Pum tar-riverb: Controls the level of the M40 Studio Reverb applied to the monitor mix for tracking purposes.
4.3 Monitor Section
- Big Volume Knob: The primary control for adjusting the overall output volume to your studio monitors. This control is independent of your computer's volume.
- High Resolution Meter: Provides precise visual feedback on input and output levels, helping to prevent clipping and for mastering purposes.
- Direct Monitor Mix Knob: Blends the direct input signal with the playback signal from your computer (DAW). Turn towards 'input' for more direct monitoring (zero latency) and towards 'DAW' for more playback from your software.
- DIM Switch: Reduces the monitor output volume by a fixed amount for quick level attenuation without losing your main volume setting.
- MONO Switch: Sums the stereo monitor output to mono, useful for checking phase compatibility and mix balance.
- Phones Knob: Adjusts the volume for the headphone output independently from the main monitor output.
4.4 M40 Studio Reverb
The M40 Studio Reverb is integrated into the Desktop Konnekt 6. It can be used for monitoring during tracking without affecting the recorded signal. The reverb parameters can be adjusted via the control panel software on your computer. It also functions as a native VST/AU plug-in within your DAW.
- Algoritmi: Choose between Hall (large, warm reverb), Room (intimate ambience), and Plate (classic metallic plate reverb).
5. Manutenzjoni
To ensure the longevity and optimal performance of your TC Electronic Desktop Konnekt 6, follow these maintenance guidelines:
- Tindif: Use a soft, dry cloth to clean the exterior of the unit. Avoid abrasive cleaners, solvents, or waxes. Do not spray liquids directly onto the unit.
- Ambjent: Operate the unit in a clean, dry environment away from direct sunlight, excessive heat, humidity, or dust. Ensure adequate ventilation around the unit.
- Ġestjoni tal-Kejbil: Żomm il-kejbils organizzati u ħielsa minn brim jew liwja eċċessiva biex tevita l-ħsara.
- Ħażna: If storing the unit for an extended period, disconnect all cables and store it in its original packaging or a protective case in a cool, dry place.
6 Issolvi l-problemi
This section addresses common issues you might encounter with your Desktop Konnekt 6.
6.1 L-ebda Ħruġ tal-Ħoss
- Iċċekkja l-Konnessjonijiet: Ensure all audio cables (monitors, headphones) are securely connected to the correct outputs.
- Livelli tal-Volum: Verify that the main volume knob and headphone volume knob are turned up. Check volume levels within your computer's operating system and DAW.
- Direct Monitor Mix: Adjust the 'input/DAW' knob to ensure you are hearing the desired source.
- Installazzjoni tas-sewwieq: Confirm that the latest drivers for the Desktop Konnekt 6 are correctly installed and recognized by your computer.
6.2 Popping Sound on Startup/Wake
- This can occur when the interface powers on or wakes from sleep, sending a transient signal to connected speakers.
- Soluzzjoni: It is recommended to power on your studio monitors wara the Desktop Konnekt 6 and your computer have fully started up, and to power them off qabel shutting down or putting the interface/computer to sleep.
6.3 Firewire Connectivity Issues (Random Dropouts, No Recognition)
- Firewire Chipset Compatibility: The Desktop Konnekt 6, like many Firewire audio interfaces, is highly sensitive to the Firewire controller chipset in your computer. It is widely known to perform best with Texas Instruments (TI) Firewire chipsets. Other chipsets (e.g., VIA, NEC) may cause instability, audio dropouts, or prevent the device from being recognized.
- MacBook Specifics: Some batches of Apple MacBooks (particularly older models) were manufactured with non-TI Firewire chipsets that are incompatible with this device. If you experience issues on a MacBook, research your specific model's Firewire chipset.
- External Firewire Card: If your computer does not have a TI chipset, consider installing an external PCIe Firewire card with a TI chipset (for desktops) or a compatible ExpressCard/CardBus adapter (for laptops) to resolve connectivity issues.
- Aġġornamenti tas-sewwieq: Ensure your Firewire port drivers are up-to-date.
- Iċċekkja tal-Cable: Try a different Firewire cable to rule out a faulty cable.
6.4 Software Not Recognizing Device
- Installazzjoni tas-sewwieq: Reinstall the latest drivers from the TC Electronic websit.
- Firewire Connection: Ensure the Firewire cable is securely connected and the interface is powered on.
- Issettjar tad-DAW: Check your Digital Audio Workstation's (DAW) audio settings to ensure the Desktop Konnekt 6 is selected as the input and output device.
- Ribootja mill-ġdid: Restart your computer and the Desktop Konnekt 6.
7. Speċifikazzjonijiet Tekniċi
| Karatteristika | Speċifikazzjoni |
|---|---|
| Piż tal-oġġett | 1.8 liri |
| Dimensjonijiet tal-Prodott (WxHxD) | 7.5" x 2.56" x 7.04" (185 x 64 x 176mm) |
| SampRata tal-linarda | 24-bit / 192 kHz |
| Teknoloġija tal-Konnettività | FireWire 1394 |
| Numru ta 'Kanali | 2 |
| Mic Preamp | IMPACT™ Mic preamp with 48V phantom power |
| Inputs tal-kitarra | True Hi-Z guitar inputs |
| Reverb | M40 Studio Reverb powered by AlgoFlex™ (Hall, Room, Plate) |
| Software Inkluż | Cubase LE4 |
| Kompatibilità tas-Sistema Operattiva | Windows, macOS |
| Provvista tal-Enerġija | Bus powered or external 12V DC/0.7A |
8. Garanzija u Appoġġ
For detailed warranty information, please refer to the documentation included with your product at the time of purchase or consult the official TC Electronic websit. It-termini tal-garanzija jistgħu jvarjaw skont ir-reġjun u l-bejjiegħ bl-imnut.
For technical support, driver downloads, and additional resources, please visit the official TC Electronic support page. Ensure you have your product model number and serial number ready when contacting support.