
1. Introduzzjoni
This manual provides detailed instructions for the installation, operation, and maintenance of your ASUS DRW-1814BLT SATA DVD+/-RW Burner with LightScribe technology. Please read this manual thoroughly before using the device to ensure proper functionality and to prevent damage.
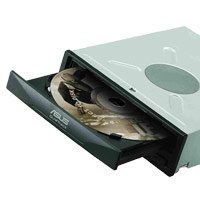
Figure 1: ASUS DRW-1814BLT Internal Optical Drive
2. Informazzjoni dwar is-Sigurtà
Osserva l-prekawzjonijiet ta' sigurtà li ġejjin biex tevita korrimenti u ħsara lill-apparat:
- Elettriku Statiku: Always discharge static electricity from your body before handling the drive by touching a grounded metal object.
- Provvista tal-Enerġija: Ensure the computer's power supply is disconnected before installation or removal.
- Ventilazzjoni: Do not block the ventilation openings of your computer case, as this can lead to overheating.
- Radjazzjoni tal-Lejżer: This product contains a laser diode. Do not attempt to open the drive casing or look directly into the laser beam.
- Immaniġġjar: Handle the drive carefully. Avoid dropping or subjecting it to strong impacts.
3. Kontenut tal-Pakkett
Ivverifika li l-oġġetti kollha huma preżenti fil-pakkett:
- ASUS DRW-1814BLT SATA DVD+/-RW Burner
- Kejbil tad-Data SATA
- Viti tal-Immuntar
- Gwida ta 'Installazzjoni Mgħaġġla
- Software/Driver CD (may vary by region)
4. Setup u Installazzjoni
Follow these steps to install your optical drive:
- Ipprepara l-kompjuter tiegħek: Turn off your computer and disconnect the power cord. Open the computer case.
- Sib drive bay disponibbli: Identify an empty 5.25-inch drive bay. Remove the front panel cover if necessary.
- Installa d-drajv: Slide the ASUS DRW-1814BLT into the drive bay from the front of the computer case until the mounting holes align.
- Sikura d-drajv: Use the provided mounting screws to secure the drive to the computer case.
- Qabbad il-kejbils:
- Connect one end of the SATA data cable to the drive's SATA data port and the other end to an available SATA port on your motherboard.
- Connect a SATA power connector from your power supply unit (PSU) to the drive's SATA power port.
- Agħlaq il-każ: Replace the computer case cover and reconnect the power cord.
- Power on and verify: Turn on your computer. The operating system should automatically detect and install the necessary drivers for the drive. If not, install drivers from the provided CD or ASUS support websit.
Figure 2: Illustrative image of an internal optical drive installation (actual product may vary slightly)
5. Istruzzjonijiet Operattivi
5.1. Loading and Ejecting Discs
- Biex Tagħbija: Press the eject button on the drive's front panel. The disc tray will open. Place the disc label-side up in the tray and gently push the tray back in until it clicks.
- Biex Tkeċċi: Press the eject button on the drive's front panel, or right-click the drive icon in 'My Computer' (Windows) or 'Finder' (macOS) and select 'Eject'.
5.2. Qari tad-Diski
Once a disc is loaded, your operating system will typically prompt you with options for how to handle the disc (e.g., play a movie, open files, install software). If no prompt appears, navigate to 'My Computer' or 'Finder' and double-click the drive icon.
5.3. Burning Discs
The ASUS DRW-1814BLT supports burning various disc formats, including DVD+/-R, DVD+/-RW, DVD-RAM, CD-R, and CD-RW. Burning software (e.g., Nero, Roxio, or built-in OS tools) is required.
- Insert a blank, recordable disc into the drive.
- Iftaħ is-softwer tal-ħruq tad-diski preferut tiegħek.
- Select the type of project (e.g., Data Disc, Audio CD, Video DVD).
- Żid il- files you wish to burn to the project.
- Follow the software's prompts to start the burning process. Ensure the computer is not interrupted during burning.
6. LightScribe Technology
LightScribe is a technology that allows you to burn silkscreen-quality labels directly onto the surface of LightScribe-enabled discs using the same laser that burns data. This eliminates the need for sticky labels or markers.
6.1. Requirements for LightScribe
- LightScribe-enabled drive: Your ASUS DRW-1814BLT supports LightScribe.
- LightScribe-enabled discs: These discs have a special coating on the label side. Look for the LightScribe logo on the disc packaging.
- LightScribe System Software: This software is typically included with your burning application or can be downloaded from the official LightScribe websit.
- LightScribe Labeling Software: A compatible application to design and print your labels.
6.2. Creating a LightScribe Label
- Burn your data to the disc as usual (if desired).
- Flip the disc over and insert it into the drive with the label side facing down.
- Open your LightScribe labeling software.
- Design your label using text, images, and graphics.
- Select the desired print quality (e.g., Best, Normal, Draft). Higher quality takes longer.
- Start the labeling process. The drive will use its laser to etch the design onto the disc surface.
Figura 3: Eżample of a LightScribe disc being labeled (actual process is internal)
7. Manutenzjoni
Proper maintenance ensures the longevity and performance of your optical drive.
- Żommha Nadif: Regularly clean the exterior of the drive and the computer case to prevent dust buildup.
- Immaniġġjar tad-Diska: Always handle discs by their edges. Avoid touching the recording surface. Store discs in protective cases.
- Tindif tal-Lenti: If you experience frequent read errors, the drive's laser lens might be dirty. Use a specialized optical drive cleaning disc (available separately) to clean the lens. Do not attempt to clean the lens manually with cotton swabs or other objects.
- Aġġornamenti tal-Firmware: Iċċekkja l-appoġġ tal-ASUS perjodikament website for firmware updates for your drive. Firmware updates can improve compatibility and performance.
8 Issolvi l-problemi
If you encounter issues with your ASUS DRW-1814BLT, refer to the following common problems and solutions:
| Problema | Kawża Possibbli | Soluzzjoni |
|---|---|---|
| Id-drajv mhux skopert mill-OS | Loose cables, incorrect BIOS settings, driver issue | Check SATA data and power cable connections. Verify BIOS settings for SATA ports. Reinstall or update drivers. |
| Disc read errors | Dirty or scratched disc, dirty laser lens, incompatible disc format | Clean the disc. Use a drive cleaning disc. Try a different disc. Ensure disc format is supported. |
| Burning failures | Poor quality media, burning speed too high, background processes, insufficient disk space | Use high-quality blank media. Try a lower burning speed. Close unnecessary applications. Ensure sufficient hard drive space for temporary files. |
| Tray does not open/close | Mechanical obstruction, power issue | Check for obstructions. Ensure power cable is securely connected. Use the emergency eject hole (small pinhole on front panel) if necessary. |
9. Speċifikazzjonijiet
Key technical specifications for the ASUS DRW-1814BLT:
- Tip ta' Apparat: DVD±RW (±R DL) / DVD-RAM drive / LightScribe
- Tip ta' kompartiment: Intern
- Interface: Serial ATA (SATA 3.0 Gb/s)
- Dimensjonijiet (WxDxH): 5.9 pulzieri x 6.8 pulzieri x 1.7 pulzieri (150 mm x 173 mm x 43 mm)
- Piż: 1.8 lb (0.82 kg)
- Optical Storage: 5.25" x 1/2H
- Veloċità tal-Qari tal-Ħażna Ottika: DVD ta' 16X
- Veloċità tal-Kitba tal-Ħażna Ottika: High Speed (exact speed varies by media type)
- Karatteristika Speċjali: LightScribe Direct Disc Labeling
- Numru tal-Mudell: 90-D4064B-UAN8W
10. Garanzija u Appoġġ
Your ASUS DRW-1814BLT is covered by a limited manufacturer's warranty. For specific warranty terms and conditions, please refer to the warranty card included with your product or visit the official ASUS support website. For technical assistance, driver downloads, and firmware updates, please visit www.asus.com/support/.